Add and manage apps, services, and app directories with SDD
You can add an app to your smart desktop in one of 2 ways:
- by using the SDD
- by editing the appD directly.
Because SDD is basically a configuration editor, it modifies appD for you. In this topic we focus only on adding and managing apps by using SDD. For more info about adding apps programmatically, see Add apps.
The Manage apps screen has 3 tabs, one for apps, one for app services, and the third one for freestanding apps. Strictly speaking, all these are kinds of apps, but some require extra considerations and so they have their own tabs.
On the Apps tab you can see what apps you have available for your smart desktop. All the apps are listed in the lower part of the screen. You can also add, delete, or edit apps on this screen. Finally, you can launch an app from this screen by clicking it.
On the Services tab you add a special kind of app called an app service. We'll talk about these services later in this topic.
Apps
On the Apps tab you add apps. Finsemble allows you to add 3 kinds of apps: web, native, and virtual. Each needs to be configured slightly differently, but the start of the process is the same. To add an app, click + Add. In the box that appears, specify which kind of app it is by clicking the appropriate box.
To add a web app
Click URL and then specify the URL for the app. Give your app a name and click Save.
To add a native app
- Click Path.
- Next, you need to locate it on your computer. Click Select file and navigate to the app. You can also drag a native app onto the Manage apps screen.
- The final thing to specify for this type of app is the API access. By default this option is enabled, but if your app doesn't need access to Finsemble API, clear this checkbox. Give your app a name, and click Save when done.
Finsemble supports native apps for Windows only.
To add a virtual app
Click Virtual. Enter the virtual app name. By default this name is also used as the display name, but you can change it if you want. Click Save.
Before you can use a virtual app, the virtual server that runs it must be configured. You need to do this outside of SDD. For more info, see Setting up the virtual app interop.
If your org uses multiple menus and you have already configured them, make sure the app you just added appears on at least one menu. If you forget to add the new app to at least one menu, users won't be able to launch it. In contrast, if you haven't configured menus and still have the original AppLauncher menu that your Finsemble comes with, no action is needed and the app will automatically appear on that global menu after you add it.
Remove an app
To remove an app, click the waste basket icon associated with it. There is no way to undo this operation, so if you accidentally removed an app you didn't mean to, you need to add it again manually.
App directories
In addition to adding apps, you can also add app directories. These could be your own, or ones that other organizations share. One example is the app directory from FINOS.
To add an app directory
Follow these steps:
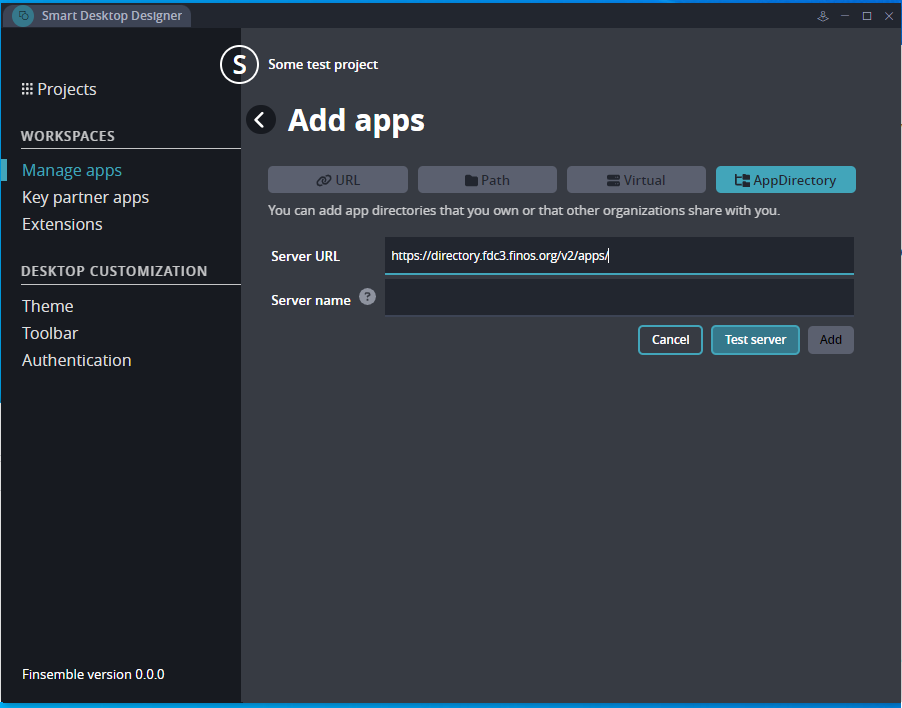
On Manage apps, click Add.
On the Add apps page that appears, click AppDirectory.
Click Add app directory.
In the Server URL field, enter the URL of the server you want to add. Click Test server to verify that the URL works. If the test fails, you won't be able to add the server.
In the Server name field, enter the name of the server.
noteYou must provide the server name even though the URL already identifies it. You won't be able to add a server without the name.
- Click Add.
To edit an app directory
Click the menu (the 3 vertical dots) and pick the Edit app directory option. Make your edits in the window that appears.
To remove an app directory
Click the menu (the 3 vertical dots) and pick the Delete app directory option. Confirm your selection in the dialog that appears.
Edit apps
To edit an app, find it in the list and click the Edit icon. (Don't click the app itself, as this will launch it rather than allowing you to edit it.) The Edit app screen that appears has two parts. The top part describes the basics about the app, including its name, location, the location of the icon associated with the app, and the description. You can also see whether the app is web or native, but you can't change the app from one type to another by simply changing this field here.
In the lower part of the screen you have some optional config settings. Click the down arrow to see what settings are available. Some of these options might be more advanced than you're comfortable with. That's fine. You don't need to set them for your smart desktop to be useful. Other options help you finetune the appearance of your smart desktop. For example, you can specify exactly where the app initially appears.
Let's look at these configs in turn.
SelectConnect
Set this property to specify trust relationships between components. If you don't specify any such relationship, your app or component trusts everyone. In many cases this is exactly what you need. If you want your app to trust only some specific apps, find those apps in the list and select them.
Learn more about trust relationships and selectConnect.
Preload extensions
A preload is a script that runs before the app window is launched. It allows you to add functionality to your app without changing the code. You can specify an existing preload to run for the app. If you want to add to a list of available preloads, see Preloads.
Window position and dimensions
By default, Finsemble selects the location for your app window. If you want this window to appear in some other location, you can specify the details here.
You can specify the exact dimensions of the window on startup, in pixels. The user can change these dimensions unless you explicitly stop them from doing so. You can force the window to maintain the same height to width ratio by clicking Lock dimensions.
You have some control over where the window will appear. You can't specify this precisely, but you can select a position on the screen. Think of the screen as divided into 9 rectangles. You can specify the rectangle in which the window will appear. The user can move it around later. If you don't specify the position, Finsemble will decide where it goes. The most likely position is upper left. If you have multiple windows, Finsemble staggers them so it's clear there is more than one window.
The last option you have here is opacity, expressed as a percentage. And so, 100 means the window will completely obscure its background, while 0 makes the window invisible. Don't make windows invisible unless you're absolutely sure this is what you want.
If an app has multiple windows, or if a user opens multiple instances of the app, each window will initially look the same and appear in the same spot until the user moves or resizes it. Be aware that this can make it look like there is only one window.
Window behavior
In this section you define how the window behaves with respect to other elements on the smart desktop. Finsemble can manage many behaviors, such as auto arrange, docking, snapping, and so on. If you don't want Finsemble to manage the app window in this way, or if you want to disable some behaviors, clear the appropriate boxes.
For some apps it isn't necessary to display their title bar. You can remove the title bar by clearing the Show title bar checkbox.
Sometimes you might want to make sure the user does something first. To nudge the user toward this, you can make the window always on top. It will remain there until the user closes it. This is useful if you want a user to read about the changes to their desktop, for example.
Finally, you have full control over minimizing, maximizing, and closing the window.
Interop
Apps on your smart desktop communicate by using the FDC3 protocol. If you want your app to listen for and react to a specific intent, you can set it up here. All you need to do is specify the name of the intent to listen to, such as ViewChart, a display name for the app, such as Chart Viewer, and the FDC3 context to listen to, such as fdc3.instrument. The display name is mostly used in the Resolver, when there are several apps that could process the intent, and a user needs to pick the one they want.
Learn more about interop.
Component behavior
This section allows you to specify how the component behaves. The first thing you can decide is whether the component is trusted. Trusted components can do more. For example, they can run a preload. Untrusted components are more limited by design, so your smart desktop is more secure. For this reason, when you specify that a component is trusted, make sure that it deserves this designation.
In addition, you have other options to specify. You can limit the users to only one instance of the component. If you don't specify this option, a user can of course open as many instances as they want.
Some components are needed at the very beginning, when Finsemble starts. You can make sure they're available by specifying Launch at startup. It's a good practice to not use this option unless you really need it.
If you want your user to be able to launch a component, you can make it easier on them by adding it to the Apps menu on the Finsemble toolbar.
Finally, when a user switches from one workspace to another, the apps in the workspace the user left usually shut down. But some native apps are huge and take a long time to launch, and if a user switches back, they will have to wait. To speed things up, you can prevent the app from having to relaunch. Instead, you can persist the app across workspaces. The persisted app stays in the background, ready immediately the moment the user comes back to the workspace that contains it.
Workspace
Your app is added to a workspace, unless you explicitly specify that you don't want it there. There are advantages to the app being in a workspace. For example, if a user moves away from the workspace and then comes back, Finsemble will open all the apps in the workspace. If your app isn't a part of the workspace and the user needs it each time, they will have to launch it themselves.
When an app first launches, it will start from the default URL if it's a web app, or from the default path if it's native. As a user works on such apps, their state can change. In other words, a user can navigate to another URL within the app. When the user exits the workspace and comes back later, the app goes back to its default starting point. If this is not the behavior you want, you can persist the location.
Services
On the Services tab, you add and manage app services. An app service is a special kind of app that performs services for other apps. Because it's an app, you add it in the same way, as we've just seen. The optional app settings are also similar. There is one important difference: you must restart Finsemble for the addition of the app service to take effect. You don't have to restart immediately, but if you choose the Later option, you can't use the app service until you restart Finsemble. The reason for this necessity is that an app service starts during the Finsemble launch sequence. (See App services for details.) In contrast, a regular app starts when a user launches it, which is after Finsemble completes the launch sequence.
One different section for app services is the Debug toolkit section. It contains 2 settings. The first one is to make the app service visible. It typically isn't visible because an app service doesn't usually interact with the users, so there is no need to see it. Visibility might help debugging, so enable it when you need it and then disable it when you're done debugging. The other option is to open the Chrome dev tools when the app service starts. This way you can examine any issues that were logged.
Freestanding apps
A freestanding app is a special kind of app that is launched separately from Finsemble. It can still interop with other apps and participate in workflows. For more info about such apps, see Integrating freestanding apps with the JavaScript adapter.
To add a freestanding app to your smart desktop, you must specify its name. Also, every Finsemble app needs an ID. By default, Finsemble autogenerates an app ID for you. This default works well and we normally recommend that you use it if you can. But in the case of the freestanding apps, you might want to know this ID in advance so you can use it directly. One example is if you have an app that wants to raise intents against a specific app. In other words, you don't want the user to see a resolver so that they pick the right app from the list. Instead, you want the intent to go directly to your freestanding app. In this one specific case, you need to specify the app ID.
See also
Introduction to Smart Desktop Designer
Build your smart desktop with me
Setting up the virtual app interop
App services Integrating freestanding apps with the JavaScript adapter