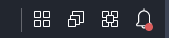
Notifications
Finsemble's notifications refresh brings with it 3 new pieces of UI. A Notification bell Icon, new and improved Toasts, and a fully featured Notification Center.
Notifications UI

Notification ID
Each notification object contains an ID that Finsemble uses to manage notifications sent to various subscribers. You can specify the notification ID yourself by setting it before you send it to the notify() function. (We will see more detail about this function in the next section.) If you leave it blank, Finsemble automatically sets one before sending it out.
Imagine both the Notification center and an app are subscribed to receive notifications. When you send a notification, both the center and the app will receive the notification object. Conceptually both of them receive the same notification object. Behind the scenes, since the app and the notification center are in different windows, they are actually getting different instances of that notification object, each with the exact same values, including the notification ID. Without instances sharing the same ID, they would look the same to the user since they have the same content, but any change in the values of the notification would not be reflected across the system.
When the receiving app performs an action on a notification, for example mark as read, this should be reflected in the notification center and all other apps (subscribers) and not only the app that performed the action. When the notification instances share the same ID, we use the ID to let all other apps know a specific notification's state has changed. Finsemble broadcasts this new state and the notification id to all apps that are subscribing to notifications. It is the responsibility of the app to use the new state and take the appropriate action. Using the notification ID and the new state it is possible for this new state to be reflected on the correct notification in the UI.
Notification search
The Notification Center provides search functionality. The search is case insensitive and only gets triggered when the search term is at least 3 characters long. Additionally, the search is atomic, meaning that it will try to match the exact characters in the search term as opposed to a best match approach with approximate results.
There are also 2 different search modes. Targeted search and generic search.
Targeted search - allows you to specify the field to which the search term will be applied. The targeted search can be performed by prefixing a
field:to your search term. The available fields are:title:,details:andsource:and the search term will only be applied to the selected field. If an invalid field is inserted, this will be ignored and a Generic search will be performed.Generic search - will search for the search term in all fields (title, details, source).
Notification modes
Finsemble UI distinguishes between two modes of Notification, informational and actionable.
Any notification that does not have actions is treated as an informational notification. Informational notifications differ in behavior from Actionable ones in that Informational notifications will disappear from the Toast UI after a configurable amount of time. Whereas an Actionable Notification will stay on the screen waiting for user interaction.
Sending an informational notification
FSBL.Clients.NotificationClient.notify({
    // id: "adf-3484-38729zg", // distinguishes individual notifications - provided by Finsemble if not supplied
    // issuedAt: "2021-12-25T00:00:00.001Z", // The notifications was sent - provided by Finsemble if not supplied
    // type: "configDefinedType", // Types defined in the config will have those values set as default
    source: "Finsemble", // Where the Notification was sent from
    title: "Request for Quote",
    details: "RIO - 9409 @ $9409",
    // headerLogo: "URL to Icon",
    // actions: [], // Note this has no Actions making it Informational
    // meta: {}, // Use the meta object to send any extra data needed in the notification payload
    // devModeOnly: true // A flag to determine whether the notification is only to be displayed if Finsemble is running in dev mode.
})
The previous example defined the Notification inline. You're also able to instantiate a Notification object for better code completion and discoverability of the Notification fields.
If you want a notification to be displayed only if Finsemble is running in dev mode then set devModeOnly: true as a property in the Notification object.
const notification = new FSBL.Clients.NotificationClient.Notification();
notification.source = "Finsemble";
notification.title = "Request for Quote";
notification.details = "RIO - 9409 @ $9409";
FSBL.Clients.NotificationClient.notify(notification);
Sending an actionable notification
It is possible for users to perform actions on received notifications. You can achieve this by populating the actions field of the Notification object with one or more Action objects. An Action object has 8 fields: buttonText, type, milliseconds, component, spawnParams, channel, payload, and markAsRead. As the name suggests, the buttonText field is the text that appears on the action's button. The type field indicates the type of action the user can perform. markAsRead, when set to true, marks the notification as read after the user performs the action. The rest of the fields are used depending on the type of action being performed.
Finsemble supports 6 action types: SNOOZE, SPAWN, DISMISS, TRANSMIT, QUERY and PUBLISH.
When setting the action type to SNOOZE, use the milliseconds field to tell Finsemble how long to snooze the specific notification for.
A DISMISS action marks the specific notification as read and doesn't use any of the other action fields.
An action with the type set to SPAWN spawns an app using the component field as the type of app to be spawned and the spawnParams field as the spawn params. This is functionally equivalent to calling FSBL.Client.LauncherClient.spawn(component, spawnParams) See the LauncherClient documentation for more info on the values of these fields.
Use the TRANSMIT, QUERY, and PUBLISH to perform complex or custom actions. Actions of these types all use the channel and payload fields. See the Custom actions section below for more info on how to use these action types.
Actions with the type set to SNOOZE or DISMISS ignore the markAsRead field.
The DISMISS Action is equivalent to marking a notification as read. Don't confuse it with the dismissing of a toast from view.
Here is an example sending actions along with a notification:
// Anatomy of A spawn action
const spawnAction = {
    buttonText: "Open Component",
    type: FSBL.Clients.NotificationClient.ActionTypes.SPAWN,
    component: "Welcome Component", // The Component Type to spawn when using the spawn action.
    spawnParams: {}, // The spawnParams passed to the spawn function. See the spawn function on the LauncherClient for more info.
    markAsRead: false // If true, the Notification will be marked as read after performing the action.
}

// Anatomy of SNOOZE action
// You're also able to instantiate an equivalent Action object to allow for better code completion.
const snoozeAction = new FSBL.Clients.NotificationClient.Action(); // A single action has been added making this an Actionable Notification
snoozeAction.buttonText = "Snooze";
snoozeAction.type = FSBL.Clients.NotificationClient.ActionTypes.SNOOZE;
snoozeAction.milliseconds = "300000"; // Used to override the snooze length when using the SNOOZE action type
// NOTE: the markAsRead value is ignored for SNOOZE and DISMISS actions.


// Anatomy of QUERY, TRANSMIT and PUBLISH actions
const queryAction = {
    buttonText: "My Custom Action",
    type: FSBL.Clients.NotificationClient.ActionTypes.QUERY, // |TRANSMIT|PUBLISH,
    channel: "my.router.channel", // Channel to transmit payload on QUERY, TRANSMIT and PUBLISH actions
    payload: { myData: "value" } // Payload transmitted along channel on QUERY
}


FSBL.Clients.NotificationClient.notify({
    source: "Finsemble", // Where the Notification was sent from
    title: "Request for Quote",
    details: "RIO - 9409 @ $9409",
    actions: [spawnAction, queryAction, snoozeAction]
    // Actions have been added making this an Actionable Notification
})
Action groups
Action Groups allows combining related actions in the UI.

A group of actions combined into an Action Group (closed)

A group of actions combined into an Action Group (open)
Sending an Action Group is as easy as sending a notification with two or more notifications combined in an array.
const snoozeAction = {
    buttonText: "Snooze",
    type: FSBL.Clients.NotificationClient.ActionTypes.SNOOZE
}

const snoozeAction2 = {
    buttonText: "5 Min",
    type: FSBL.Clients.NotificationClient.ActionTypes.SNOOZE,
    milliseconds: "300000"
}

const snoozeAction3 = {
    buttonText: "10 Min",
    type: FSBL.Clients.NotificationClient.ActionTypes.SNOOZE,
    milliseconds: "600000"
}

// Combine them in an array
const actionGroup = [snoozeAction, snoozeAction2, snoozeAction3]

// Send
FSBL.Clients.NotificationClient.notify({
    source: "Finsemble", // Where the Notification was sent from
    title: "Request for Quote",
    details: "RIO - 9409 @ $9409",
    actions: [actionGroup] // You are able to mix and match Action Groups and Individual Actions
})
Custom actions
Snoozing, spawning a component, and marking a notification as read (DISMISS) are very useful ways of interacting with a notification on their own. These actions have some limitation in that they perform only a single operation. If you're looking to augment your user's workflow with more complex Notification to operation behavior, this is where the QUERY, TRANSMIT and PUBLISH actions shine.
Sending a notification with a QUERY, TRANSMIT or PUBLISH action can be seen below. Take a look at the Router tutorial for information on which communication model is best for your use case.
Sending a notification with a TRANSMIT action:
const queryAction = {
    buttonText: "My Custom Action",
    type: FSBL.Clients.NotificationClient.ActionTypes.TRANSMIT, // |QUERY|PUBLISH,
    channel: "my.custom.action", // Channel to transmit payload on QUERY, TRANSMIT and PUBLISH actions
    payload: { myData: "value" }, // Payload transmitted along channel on QUERY
    markAsRead: false,
};

FSBL.Clients.NotificationClient.notify({
    source: "Finsemble", // Where the Notification was sent from
    title: "Request for Quote",
    details: "RIO - 9409 @ $9409",
    actions: [queryAction],
});
We suggest setting up listeners to perform complex Actions inside a Finsemble Service as to separate concerns where possible but like with any Router api call, it can be done in a component too.
Setting up listener to perform complex queries.
const { RouterClient, NotificationClient } = FSBL.Clients; // Component Syntax
// const { RouterClient, NotificationClient } = Finsemble.Clients; // Service Syntax

RouterClient.addListener(
    "my.custom.action", // Matches action.channel
    (error, response) => {
        if (!error) {
            let notification = response.data.notification;
            let payload = response.data.actionPayload;

            console.log(notification);
            console.log(payload);
            // performCustomOperation(notification, payload)

            // Change the notification state and re-notify it
            notification.isRead = true;
            NotificationClient.notify(notification);
        }
    }
);
Notifications from an external service
When sending notifications, you might want to know the last time Finsemble received a notification from a specific source. This will allow you to send any through any previously queued notifications if Finsemble was shut down at the time of the initial sending.
const sendQueuedNotifications = async () => {
    const notificationSource = "Finsemble";
    const isoFormattedTimeStamp = await FSBL.Clients.NotificationClient.getLastIssuedAt(notificationSource);
    console.log(isoFormattedTimeStamp);

    // Fetch Notifications from External web service since "isoFormattedTimeStamp"
    // Send multiple notifications
    // FSBL.Clients.NotificationClient.notify([newNotification1, newNotification2, ...]);
};

sendQueuedNotifications();
Getting notifications inside your components
There are two ways to get notifications. Getting previously sent notifications and subscribing to future notifications.
Getting previously sent notifications
// Get notifications sent between now and one month ago
const getNotificationsHistory = async () => {
    let lastMonth = new Date();
    lastMonth.setMonth(lastMonth.getMonth() - 1);

    const notifications = await FSBL.Clients.NotificationClient.fetchHistory({sentAfter: lastMonth.toISOString()});
    console.log(notifications);
};

getNotificationsHistory();
Subscribe to all future notifications
const notificationsSubscribe = async () => {
    const subscription = {};
    const subData = await FSBL.Clients.NotificationClient.subscribe(subscription, (notification) => {
        console.log("Notification Received", notification);
        // DO something
    });
    // use subData to unsubscribe
};

notificationsSubscribe();
Subscribe to a subset of notifications
It may be that you only want to receive some notifications. This is possible by providing a filter when performing the subscription.
const filterSubscribe = async () => {
    const subscription = {
        filter: {
            // The callback below will be executed if notifications with notification.type == 'chat-notification' AND
            // notification.source == 'Symphony' are received
            include: [
                {
                    type: "chat-notification",
                    source: "Symphony",
                },
                // It's also possible to do deep matches
                { "meta.myCustomObject.field": "email-notification" }, // For an OR match add two objects in the include filter
            ],
            // The exclude filter works the same as the include filter but the callback will NOT be executed if there
            // is a match. Exclude matches take precedence over include matches.
            exclude: [],
        },
    };
    const subData = await FSBL.Clients.NotificationClient.subscribe(subscription, (notification) => {
        console.log("Filter Matches. Notification Received", notification);
        // DO something
    });
    // use subData to unsubscribe
};

filterSubscribe();

// The notification below will be Received with the filter above
FSBL.Clients.NotificationClient.notify({
    source: "Finsemble", // Where the Notification was sent from
    title: "Request for Quote",
    details: "RIO - 9409 @ $9409",
    type: "chat-notification",
    source: "Symphony",
});
Send notifications to the OS
Using the config, you can also send your notifications to the OS. Do this by specifying the proxyToWebApiFilter on the servicesConfig.notifications object in the seed ./configs/application/config.json. This is achieved by specifying a filter for the proxyToWebApiFilter field.
Notifications proxied to the OS have the limitation of not being able to perform actions.
For more information on Filters and Filtering see Subscribe to a subset of Notifications and Subscription Filters Explained
Example config:
{
    "servicesConfig": {
        "notifications": {
            "proxyToWebApiFilter": {
                "include": [
                    {
                        "type": "web"
                    }
                ],
                "exclude": []
            }
        }
    }
}
Notification types (Templates)
Defining a Notification type allows you to apply a default set of values to notifications. When a notification arrives with the type field set, the template is retrieved from the configuration and the values specified are applied to any empty/unset fields. Hence, a Notification Type is a template, making it possible to populate a Notification by only setting the type (plus any other field you need to populate or override).
Notification Types also inform the preferences UI, allowing granularity on Muting Notifications and giving users a finer level of control, by allowing them to specify Types of Notifications from each source to mute (as opposed to all notifications from that source).
Specifying a Type using the key default, will apply defaults to all notifications sent, provided that they do not match any other notification type specified.
Configure Types by adding to the servicesConfig.notifications.types object in ./configs/application/config.json in your Finsemble project.
Example type definition:
{
    "servicesConfig": {
        "notifications": {
            "types": {
                "urgent": {
                    "defaults": {
                        "cssClassName": "my-urgent-class-name",
                        "actions": [
                            {
                                "buttonText": "Mark Read",
                                "type": "DISMISS"
                            }
                        ]
                    }
                }
            }
        }
    }
}
The Type defined in the config above is urgent, and in the code snippet below, the type is set to urgent. Since the notification sent has no actions and no cssClassName, these fields will be automatically populated with the values specified in the type's config.
FSBL.Clients.NotificationClient.notify([
    {
        source: "Finsemble", // Where the Notification was sent from
        title: `Request for Quote`,
        details: "RIO - 9409 @ $9409",
        type: "urgent",
    },
]);
Customizing the display of notifications
Toast duration
Notification toasts are designed to draw the user's attention to an event. Toasts are displayed for a short period of time that is usually determined by a system default. There are a few way you can change the behavior and length of time a toast is displayed.
The Notification object has a timeout field. This field tells Finsemble how long it should display a specific notification toast. If you don't specify this value on the notification itself, Finsemble uses the system default. The default value is determined by the config setting finsemble.servicesConfig.notifications.informationalNotificationToastPeriodSeconds. This setting changes the toast duration for all notifications that don't have a timeout specified on the notification object itself. A user can override this value by specifying different preferences.
Even though the field name is prefixed with "informational", you can apply this setting to both actionable and informational toasts.
By default, both actionable and informational toasts get hidden from view after a specific amount of time. The config value finsemble.servicesConfig.notifications.toastTimeoutOnActionableNotifications changes the behavior so that all toast with an action stay in view until the user manually removes them.
Theming notifications
If you're looking to change the theme of Notifications in general, take a look at Customizing The UI
Styling individual notifications and types
You may need certain notifications or notification types to display differently in order to draw more or less attention to them. This is possible with the use of the cssClassName field on a notification. Setting this field will add the specified class name to the notification HTML making it possible to style the notifications with CSS.
To inspect and target the specific notification HTML, open up a developer console by clicking on the Finsemble icon in the top left corner of the toolbar and select "Central Logger" from the menu. In the bottom left panel, click and open the developer tools by clicking on the Notification Center and/or Notification Toasts components.
Place any targeted css in your theme outlined by the Customizing The UI tutorial.
Additional information: Take a look at Notification Types on how to apply a css class to all notifications belonging to a specific type.
Changing the entire notification
If Theming and Style are not enough to cover your needs, it's possible to create an entirely custom notification card:
Create your custom notification card and/or list row React components. You can create a completely custom notification card or compose a notification card using the Finsemble provided Notification shells components to leverage built-in Finsemble functionality.
// CustomNotificationComponentsExample.tsx
import * as React from "react";
import {
    NotificationCardPropType,
    NotificationCardHeaderShell,
    NotificationCardShell,
    NotificationCardHeaderLogo,
    NotificationCardBodyShell,
    NotificationCardBodyContentLogo,
    NotificationListRowShell,
    NotificationListRowPropType
} from "@finsemble/finsemble-core";

/**
 *  A custom Notfication Card
 */
export const CustomNotificationCard: React.FunctionComponent<NotificationCardPropType> = (props) => {
    return (
        <NotificationCardShell {...props}>
            <NotificationCardHeaderShell {...props}>
                {/* The Component children should be empty if you want the default Finsemble Notification Header */}
                <NotificationCardHeaderLogo headerLogo={props.notification.headerLogo} />
                <div className="notification-card__title">Custom</div>
                {/* NotificationCardHeaderShell will render the notification context menu */}
            </NotificationCardHeaderShell>
            <NotificationCardBodyShell {...props}>
                {/* The Component children should be empty if you want the default Finsemble Notification Header */}
                <NotificationCardBodyContentLogo contentLogo={props.notification.contentLogo} />
                <div className="notification-card__body_text">Custom</div>
                {/* NotificationCardBodyShell will render the notification Actions */}
            </NotificationCardBodyShell>
        </NotificationCardShell>
    );
};

/**
 *  A custom Notfication Center List Row
 */
export const CustomNotificationCenterRow: React.FunctionComponent<NotificationListRowPropType> = (props) => {
    return (
        <NotificationListRowShell {...props}>
            <div className="list-row__cell">Custom</div>
            <div className="list-row__cell">Row</div>
            <div className="list-row__cell">{props.notification.title}</div>
            {/* The NotificationListRowShell will render the Notification context menu */}
        </NotificationListRowShell>
    );
};
Import your custom notification card into the Notification Center and Notification Toasts components:
// finsemble-seed/src/components/notificationsToasts/NotificationsToasts.tsx
import {CustomNotificationCard} from "../notificationsCenter/CustomNotificationComponentsExample";

ReactDOM.render(
    <FinsembleProvider>
        { /* Pass in your notification card component*/ }
        <NotificationsToasts notificationCard={CustomNotificationCard} />
    </FinsembleProvider>,
    document.getElementById("notifications-toasts")
);
// finsemble-seed/src/components/notificationsCenter/NotificationsCenter.tsx

import {CustomNotificationCard, CustomNotificationCenterRow} from "./CustomNotificationComponentsExample";

ReactDOM.render(
    <FinsembleProvider>
        <NotificationsCenter
            { /* Pass in your React components */ }
            notificationCard={CustomNotificationCard}
            notificationListRow={CustomNotificationCenterRow}
        />
    </FinsembleProvider>,
    document.getElementById("notifications-center")
);
Multiple notification templates
In some cases you might need to have multiple custom notifications cards. To achieve this, create a notification card selector component.
// finsemble-seed/src/components/notificationsCenter/NotificationCardSelector.tsx
import * as React from "react";
// Import the default Finsemble notification card components
import {
    NotificationCardPropType,
    NotificationCardShell
} from "@finsemble/finsemble-core";

// Import/Create your custom notification cards components
import {CustomNotificationCard} from "./CustomNotificationComponentsExample";
const RedDiv = () => <div style={{background:"red", height:"130px"}}/>;
const BlueDiv = () => <div style={{background:"blue", height:"130px"}}/>

export const NotificationCardSelector:FunctionComponent<NotificationCardPropType> = (props) => {
    const {notification} = props;

    // Set the default fallback notification Card
    let Card = NotificationCardShell;

    // Select your card based on your specific conditions
    if(notification.type?.toLowerCase() == "custom") {
        Card = CustomNotificationCard;
    } else if (notification.type?.toLowerCase() == "red-type") {
        Card = RedDiv;
    } else if (notification.type?.toLowerCase() == "blue-type") {
        Card = BlueDiv;
    }

    // Render the selected card
    return <Card {...props} />
}
Make sure to use the NotificationCardSelector as the new notification card in the notifications center and notifications toasts react components.
// finsemble-seed/src/components/notificationsCenter/NotificationsCenter.tsx

// Import the NotificationCardSelector
import { NotificationCardSelector } from "./NotificationCardSelector";

ReactDOM.render(
    <FinsembleProvider>
        <NotificationsCenter
        {/* Pass it into the NotificationsCenter */}
        notificationCard={NotificationCardSelector}
        />
    </FinsembleProvider>,
    document.getElementById("notifications-center")
);
Based on the conditions in the NotificationCardSelector these notifications all render with different templates.
FSBL.Clients.NotificationClient.notify([
        {
            source: "Finsemble",
            title: "Request for Quote",
            details: "RIO - 9409 @ $9409",
            type: "red-type", // will match the conditions for the "RedDiv" card
        },
        {
            source: "Finsemble",
            title: "Request for Quote",
            details: "RIO - 9409 @ $9409",
            type: "custom", // will match the conditions for the "CustomNotificationCard" card
        },
        {
            source: "Finsemble",
            title: "Request for Quote",
            details: "RIO - 9409 @ $9409",
            type: "blue-type", // will match the conditions for the "BlueDiv" card
        },
        {
            source: "Finsemble",
            title: "Request for Quote",
            details: "RIO - 9409 @ $9409",
            type: "not-defined", // does not match any of the conditions and will use the default card
        }
    ]
)
Muting notifications
At its core, the purpose of a notification is to draw the user's attention and let them know something has or is about to happen. The most effective way of grabbing attention is with a Notification toast popping up from off-screen. If the information presented in the Toast is not important or relevant, and this unimportant/irrelevant information grabs the user's attention too frequently, it can frequently be distracting and can hinder the user in doing their tasks. There are two ways to control this behaviour. The first, for developers, is via the Notifications Toasts component Filter config, and the second is user-controlled muting.
Notification toasts component config
Toasts are often the main source of distraction/annoyance for a user receiving too many Notifications. It might be the case you wish to send a notification and not have it pop-up and grab the user's attention but still have it available in the Notification Center. In this case, you are able to send a notification with a specific field defined internally within your organisation identifying that this Notification is of low importance and configure the Toasts component not to show this Notification.
See below for an example:
Configure the Notification Toasts component to exclude any notifications that come in with the value meta.userDefinedFieldToSkipToasts set to true. Do this by adding an exclude filter to the NotificationsToasts.window.data.notifications object
// finsemble-seed/configs/application/UIComponents.json

"NotificationsToasts": {
    "window": {
        ...
        "data": {
            "notifications": {
                "applyMuteFilters": true,
                "filter": {
                    "include": [],
                    "exclude": [{
                        "meta.userDefinedFieldToSkipToasts": true
                    }]
                },
                ...
            }
        },
        ...
    },
    ...
}
After Restarting Finsemble, sending a notification such as the one below will not toast while still appearing in the Notification Center.
// Run in a Finsemble Developer Console
FSBL.Clients.NotificationClient.notify({
    title: "Notify world",
    source: "oms",
    type: "general",
    meta: { userDefinedFieldToSkipToasts: true },
});
User-controlled showing notifications
Users also have some ability to control what notifications are able to grab their attention. You can control which notifications are shown via the Notification context menu.
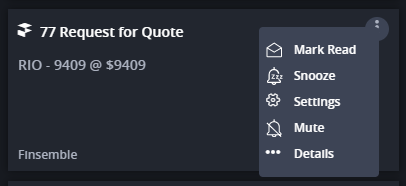
Muting from the notification context menu
After you set the "Don't show" option, any notifications process after that point will have the isMuted value set to true. At this point the Notification UI can then be configured to respect or ignore this isMuted value. This is done changing the component's applyMuteFilters value to true. The default configuration is for the mute filters to only be applied to the toasts component, meaning muted notifications will appear in the Center. Setting this to false would mean disabling user muting.
Set the applyMuteFilters value.
// finsemble-seed/configs/application/UIComponents.json

"NotificationsToasts": {
    "window": {
        ...
        "data": {
            "notifications": {
                "applyMuteFilters": true,
                ...
            }
        },
        ...
    },
    ...
}
we do not recommend applying mute filters on the Notification Center
Muting from the Preferences panel
User are also able to mute from the Preferences Panel found in the File Menu > Preferences > Notifications > Notification Sources.

If the panel above does not appear in your User Preferences component, add it in by following the step "Add The Notifications Menu to the User Preferences" in Using Notifications with Older Seeds below.
Notification storage and persistence
Persistence
By default, Finsemble stores a maximum of 1000 notifications or 7 days which ever comes first. These directives can be changed on the notifications object on the servicesConfig object in ./configs/application/config.json. See the Config Reference for more information.
Notifications are not actively purged. As a new notification comes in, the collection is evaluated for notifications to purge from storage.
Storage
Finsemble notification gets persisted using the finsemble.notifications storage topic. To change the storage adapter Notifications uses, set the appropriate value by adding the finsemble.notifications key to the servicesConfig.storage.topicToDataStoreAdapters object in ./configs/application/config.json in the Finsemble seed:
{
    "servicesConfig": {
        "storage": {
            "topicToDataStoreAdapters": {
                "finsemble.notifications": "IndexedDBAdapter"
            }
        }
    }
}
Remote desktop and transparency support
Notifications do work over RDP but will need a config update due to the way that transparency appears when running Finsemble on RDP.
In your configs/application/UIComponents.json in the Finsemble Seed, change to the value "[Component Name].window.options.transparent": true to false for the NotificationsToasts and NotificationsCenter components.
Subscription filters
Primitives
A primitive is an object with properties that are matched.
{source:"Finsemble"}- primitive that checks that the source field is equal to "Finsemble"
Multiple fields in a primitive are, by default, joined by logical AND. See under Modifiers to change this.
{source:"Finsemble",type:"RFQ"}- primitive that checks that the source field is equal to "Finsemble" AND that the type field is equal to RFQ
The name of a field in a primitive is always the name of the field to match in the record. The value can be one of:
- Basic types: string, number, date - will match directly against the value in the record. Case is ignored in string matches.
- Array: will match against any one of the values in the array. See below.
Primitives will filter against individual values and against one or more matches in an array. So the filter {field:"value1"} will match against any of the following objects:
{field:"value1"}{field:["value1","differentValue"]}{field:["differentValue","value1"]}
Deep filtering
You are not limited to filtering only at the top level. You also can do deep filter on an object of an object using dot-notation. So if you want to match on the object {meta: {customValue: true}} then you can filter:
let filter = { "meta.customValue": true };
The above is a filter primitive that checks that the field "meta" has an object as its value, which in turn has a key "customValue" with a value of true. You can go as deep as you want. The following is a completely valid deep-filter primitive:
let filter = {"meta.customObject.moreData.field":"my value"}
Any modifiers that apply to simple primitives apply to deep fields as well.
Deep filtering arrays
Deep Filtering is not limited to objects embedded in objects. You can have arrays of objects embedded in objects. You even can have arrays of objects embedded in arrays of objects embedded in... (you get the idea!).
Array primitive
If the value of a field in a primitive is an array, then it will accept a match of any one of the array values.
{field:["valueA","valueB"]} // accepts any record where the field matches 'valueA' or 'valueB'
Additionally, if the target record also has an array, it will accept a match if any one of the values in the array of the record matches any one of the values in the array of the filter term.
{field:["valueA","valueB"]}
will match any of these:
{field:"valueA"}
{field:"valueB"}
{field:["valueA","Jim"]}
Using notifications with .Net client
The Finsemble.dll provides API for notification management. The main concept is the same as in JavaScript. WPF and Winforms-based components use NotificationClient to send and receive notifications.
- Sending an Informational Notification:
Notification notification = new Notification();
notification.IssuedAt = DateTime.Now;
notification.Source = ".Net NotifyComponent";
notification.HeaderText = "Notification header";
notification.Title = "Informational Notification";
notification.Details = "Notification from .Net";
notification.Type = "email";
notification.HeaderLogo = "http://localhost:3375/components/finsemble-notifications/components/shared/assets/email.svg";
notification.ContentLogo = "http://localhost:3375/components/finsemble-notifications/components/shared/assets/graph.png";

FSBL.NotificationClient.Notify((new[] { notification }), (s, r) => {
    FSBL.Logger.Log(new JToken[] {
        "Notification sent,\nnotification: " + notification.ToString()
        + "\nresponse: " + (r.response != null ? r.response.ToString() : "null")
        + "\nerror: " + (r.error != null ? r.error.ToString() : "null")
    });

    //check response for notification id
}); - Sending an Actionable Notification:
Notification notification = new Notification();
notification.IssuedAt = DateTime.Now;
notification.Source = ".Net NotifyComponent";
notification.HeaderText = "Notification header";
notification.Title = "Actionable Notification";
notification.Details = "Notification from .Net";
notification.Type = "email";
notification.HeaderLogo = "http://localhost:3375/components/finsemble-notifications/components/shared/assets/email.svg";
notification.ContentLogo = "http://localhost:3375/components/finsemble-notifications/components/shared/assets/graph.png";

NAction dismiss = new NAction();
dismiss.ButtonText = "Dismiss";
dismiss.Type = ActionTypes.DISMISS;

NAction snooze = new NAction();
snooze.ButtonText = "Snooze";
snooze.Type = ActionTypes.SNOOZE;
snooze.Milliseconds = 10000;

NAction welcome = new NAction();
welcome.ButtonText = "Welcome";
welcome.Type = ActionTypes.SPAWN;
welcome.Component = "Welcome Component";

notification.Actions.Add(snooze);
notification.Actions.Add(welcome);
notification.Actions.Add(dismiss);

FSBL.NotificationClient.Notify((new[] { notification }), (s, r) => {
    FSBL.Logger.Log(new JToken[] {
        "Notification sent,\nnotification: " + notification.ToString()
        + "\nresponse: " + (r.response != null ? r.response.ToString() : "null")
        + "\nerror: " + (r.error != null ? r.error.ToString() : "null")
    });

    //check response for notification id
}); - Custom Actions:
Notification notification = new Notification();
notification.IssuedAt = DateTime.Now;
notification.Id = "wpf_notification_456";
notification.Source = ".Net NotifyComponent";
notification.Title = "Custom Actions";
notification.HeaderText = "Notification header";
notification.Details = "Notification from .Net";
notification.Type = "chat";
notification.HeaderLogo = "http://localhost:3375/components/finsemble-notifications/components/shared/assets/chat.svg";
notification.ContentLogo = "http://localhost:3375/components/finsemble-notifications/components/shared/assets/sheild.png";

NAction query = new NAction();
query.ButtonText = "Send Query";
query.Type = ActionTypes.QUERY;
query.Channel = "query-channel";
query.Payload = new JObject();
query.Payload.Add("hello", new JValue("world"));

NAction transmit = new NAction();
transmit.ButtonText = "Send Transmit";
transmit.Type = ActionTypes.TRANSMIT;
transmit.Channel = "transmit-channel";
transmit.Payload = new JObject { };
transmit.Payload.Add("foo", new JValue("bar"));

NAction publish = new NAction();
publish.ButtonText = "Send Publish";
publish.Type = ActionTypes.PUBLISH;
publish.Channel = "publish-channel";
publish.Payload = new JObject { };
publish.Payload.Add("xyzzy", new JValue("moo"));

notification.Actions.Add(query);
notification.Actions.Add(transmit);
notification.Actions.Add(publish);

FSBL.NotificationClient.Notify((new[] { notification }), (s, r) => {
    FSBL.Logger.Log(new JToken[] {
        "Notification sent,\nnotification: " + notification.ToString()
        + "\nresponse: " + (r.response != null ? r.response.ToString() : "null")
        + "\nerror: " + (r.error != null ? r.error.ToString() : "null")
    });

    //check response for notification id
}); - Subscribe to all notifications:
Subscription sub = new Subscription();
sub.Filter = new Filter();
//sub.filter.include = new Dictionary<String, Object>();
//sub.filter.include.Add("type", "email");

EventHandler<FinsembleEventArgs> onSubHandler = (s, r) =>
{
    FSBL.Logger.Log(new JToken[] {
        "Subscription request sent,\nSubscription: " + sub.ToString()
        + "\nresponse: " + (r.response != null ? r.response.ToString() : "null")
        + "\nerror: " + (r.error != null ? r.error.ToString() : "null")
    });
    if (r.response != null)
    {
        subscription = Subscription.FromJObject((JObject)r.response);
        Application.Current.Dispatcher.Invoke(delegate //main thread
        {
            Unsubscribe.IsEnabled = true;
            Subscribe.IsEnabled = false;
        });
    }
};

EventHandler<Notification> onNotifyHandler = (s, r) =>
{
    FSBL.Logger.Log(new JToken[] {
        "Received Notification,\nnotification: " + r.ToString()
    });

    Application.Current.Dispatcher.Invoke(delegate //main thread
    {
        NotificationData.Text = r.ToString();
    });
};

FSBL.NotificationClient.Subscribe(sub, onSubHandler, onNotifyHandler); - Unsubscribe:
EventHandler<FinsembleEventArgs> onUnsubHandler = (s, r) =>
{
    FSBL.Logger.Log(new JToken[] {
        "Unsubscribe request sent,\nSubscription id: " + subscription.Id
        + "\nresponse: " + (r.response != null ? r.response.ToString() : "null")
        + "\nerror: " + (r.error != null ? r.error.ToString() : "null")
    });

    if (r.error == null) subscription = null;
    Application.Current.Dispatcher.Invoke(delegate //main thread
    {
        Unsubscribe.IsEnabled = false;
        Subscribe.IsEnabled = true;
    });
};

FSBL.NotificationClient.Unsubscribe(subscription.Id, onUnsubHandler);