 Legacy version 6 documentation. View current documentation.Legacy version 6 documentation. View current documentation.
With Finsemble you can assemble applications into a unified desktop experience. This includes both the web apps and the native apps, although the integration process is a little different. In fact, in Finsemble the native apps have access to the full set of services and APIs. This means that you can make the native apps a part of an integrated workflow with a small amount of work.
In this topic, we will learn how to integrate native apps. You can integrate them both visually and logically:
From the end user perspective, the native apps look and behave similarly to web apps. In fact, users often can’t tell the difference. You can drag data from one app to another, you can link them so that they share context, and you can create low code workflows using both types of apps. In addition, authentication, authorization, storage and other enterprise services can be accessed the same way by both.
A native app is an app that has been created for a specific device type (such as a laptop, a desktop, or a phone) and a specific operating system (for example, Windows or Mac). Native apps must be installed directly on the type of device they were developed for. Unlike Web-based apps, which are not specific to the platform they run on, native apps can’t run on a platform they are not developed for unless you modify them. The most common native apps used with Finsemble are written in .NET and Java, but there are many others. A typical native app has one window, but this isn’t always the case. There are other types of native apps, and we’ll look at them in a moment. In addition to native apps, there are also other kinds of apps, including web and hybrid apps. Not all companies have native apps that they want to integrate into their smart desktop. A typical end user can’t tell the difference between native apps and other types of apps, and they shouldn’t have to. On a smart desktop, they can drag and drop data from one app to another, link apps, create low code workflows between apps of different types, and expect the same authentication, authorization, and other enterprise service support for any app, web or native. However, from the desktop interop perspective, there is a difference. Let’s take a closer look.
To visually integrate a native app, you must first assimilate it. The executable AssimilationMain.exe acts as a bridge between native windows events (such as move, minimize, maximize, etc.) and Finsemble, communicating over a WebSocket that runs on the desktop’s loopback address (localhost).
AssimilationMain.exe is a component of Finsemble and you don’t have to manually install it on the user's desktops. It is included as a Finsemble asset and runs dynamically.Let’s first look at the concepts you will need to integrate native applications into Finsemble workflows. Later we’ll look at specific examples.
![]() Note: Currently Assimilation works for Windows only.
Note: Currently Assimilation works for Windows only.
Assimilation extends the capabilities of the Electron-based container. At the first glance, the term “assimilation” suggests that it is a one time event—a native app undergoes assimilation and now functions like a web one within Finsemble. But this is not the case. In Finsemble, Assimilation runs continuously to support the visual integration of native windows.
Let’s look at the simple example in detail, and then we’ll tweak the process to account for different types of apps.
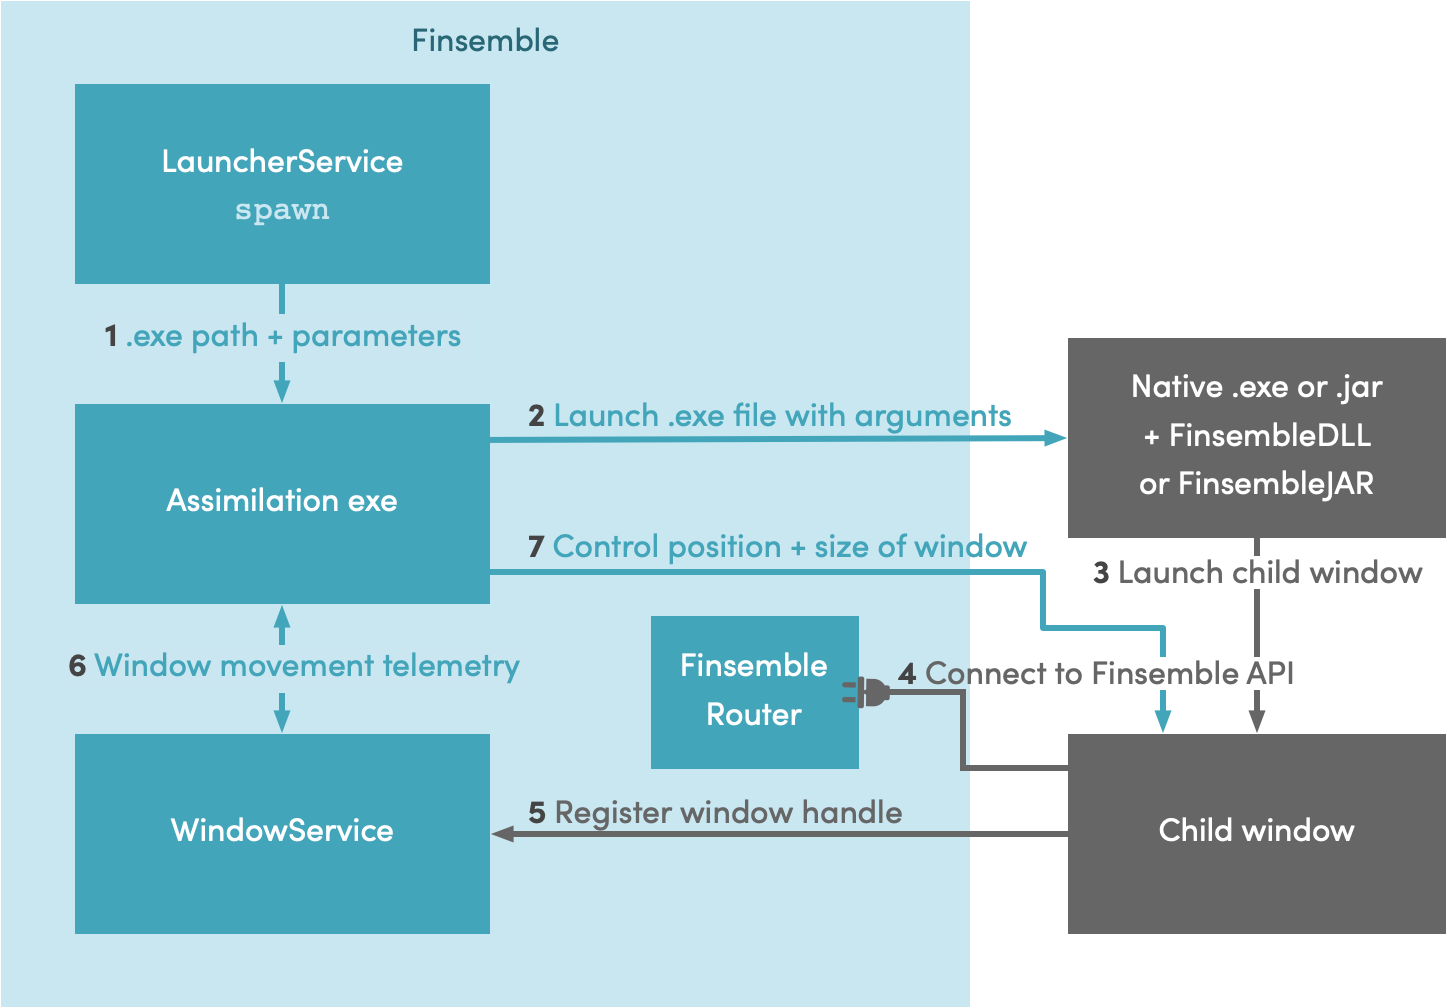
In this example, we assimilate an app launched by Finsemble, via a command line call. This diagram shows the process:
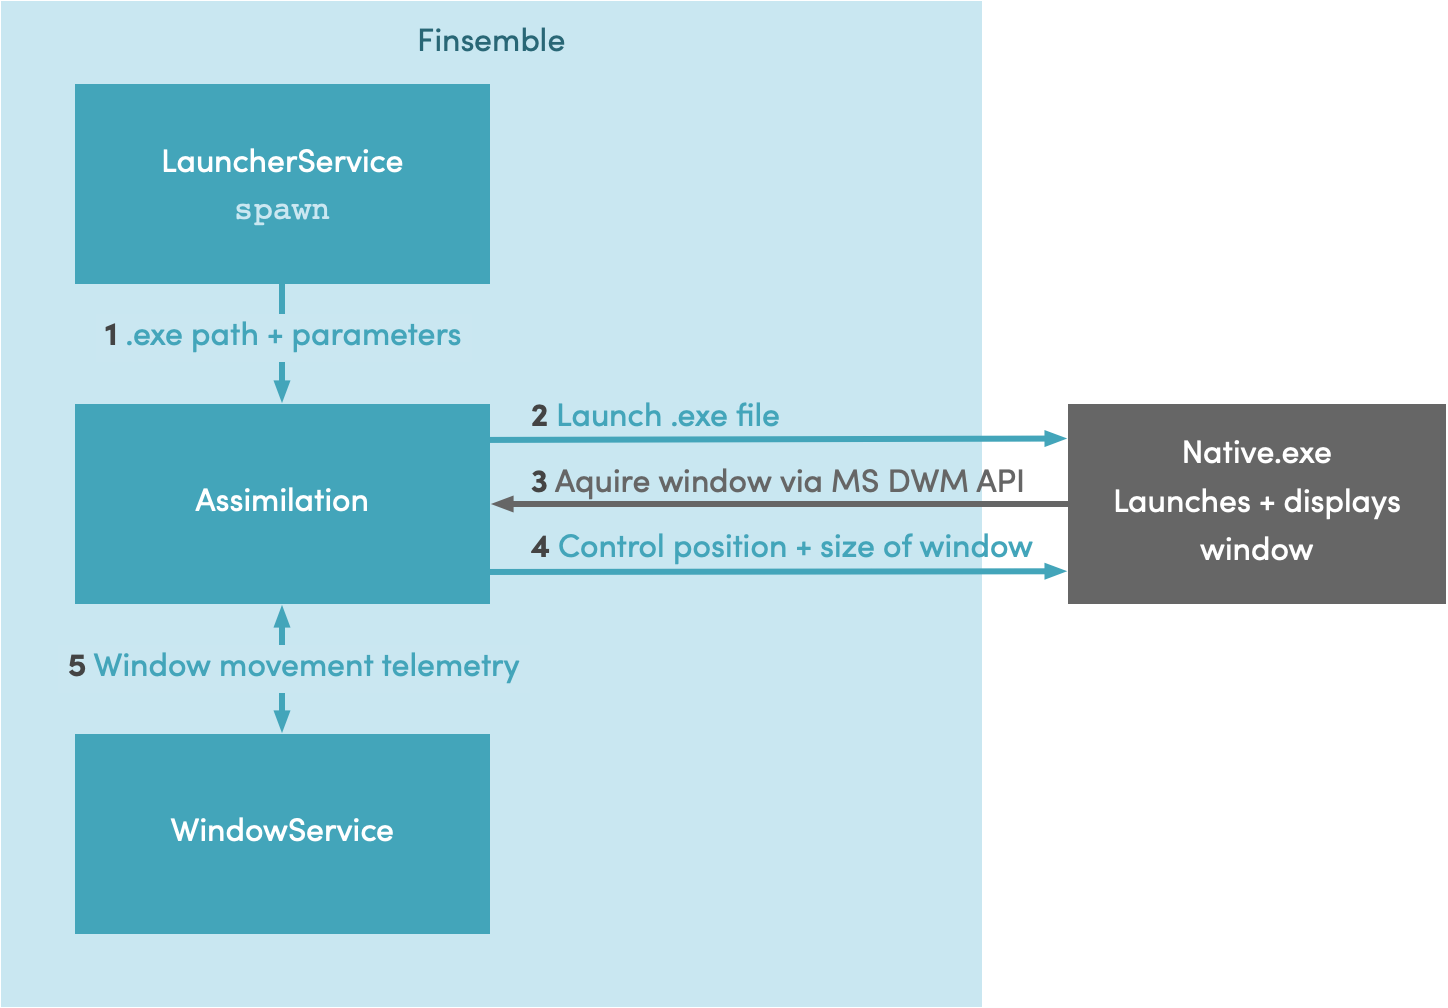
This process results in visual integration of an app that has one window. Logical integration requires a little bit more work.
The process we just looked at doesn’t account for API integration. Let’s add it now. Here’s the tweaked process:
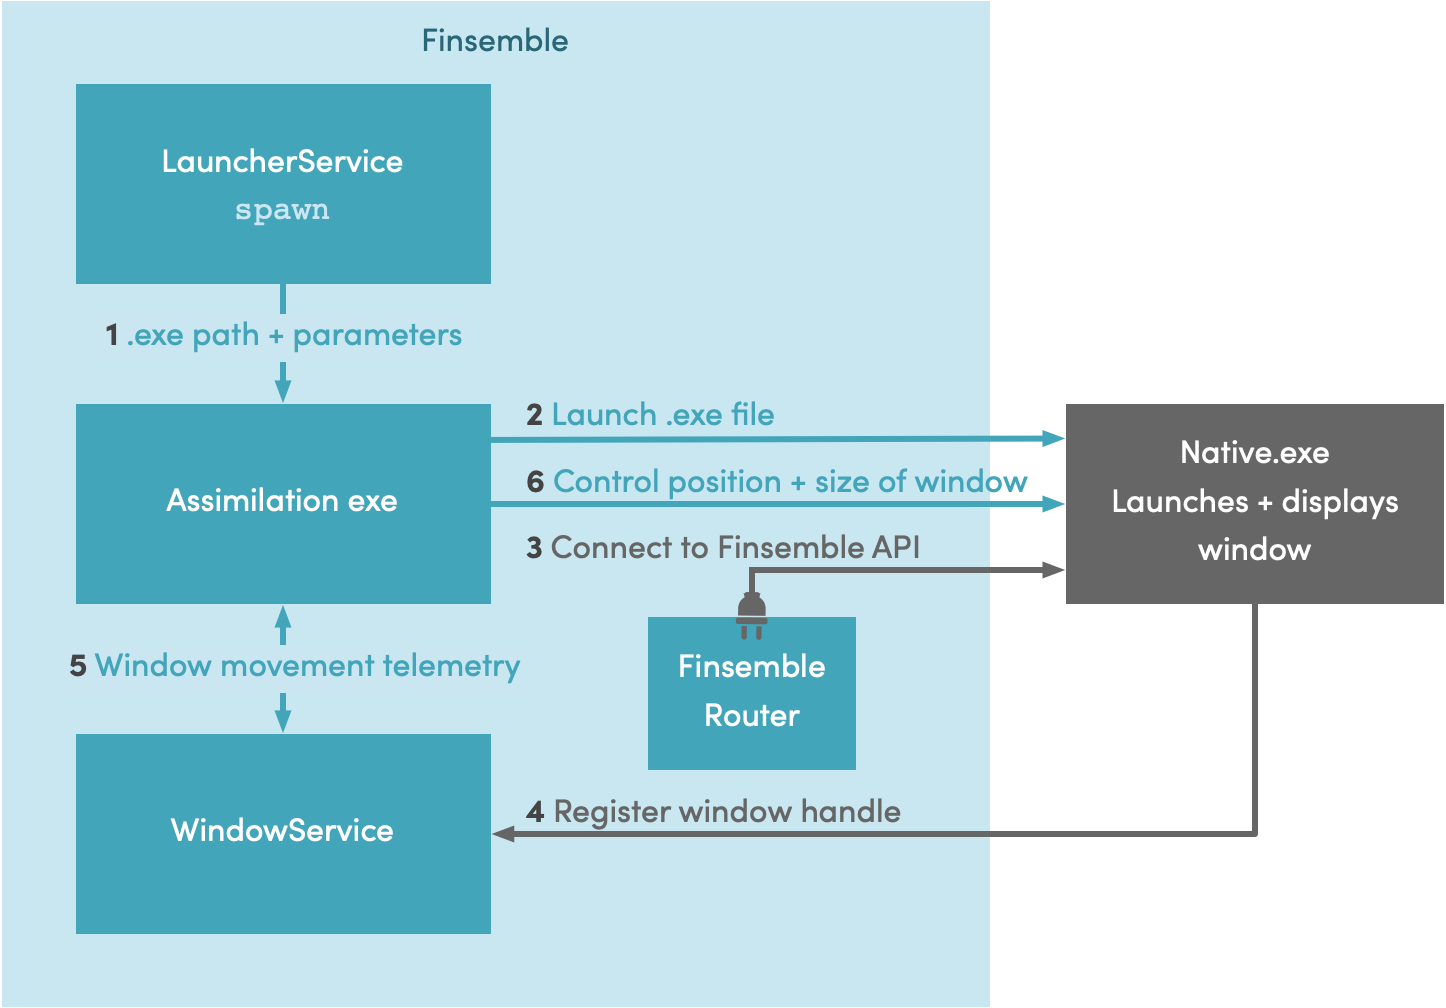
As you can see, this new process is similar to the one we looked at in the previous section. The difference is that now, instead of acquiring the window handle automatically, we use the Finsemble router to connect to the Finsemble API and specify the window handle to acquire.
With API integration, the app now has access to all of Finsemble's services, including FDC3 (which in Finsemble is called the interop service).
To integrate an app, Finsemble generates command-line arguments and passes them to the native app so that the app can connect to Finsemble. These arguments specify:
We have just seen the assimilation process for a typical app. There is one case in which this process is significantly simpler. Consider a windowless app. Such apps are useful when there is no need for a user interface. The app starts, connects to a data source and provides services to other applications. There is no UI, and hence no need for an actual window.
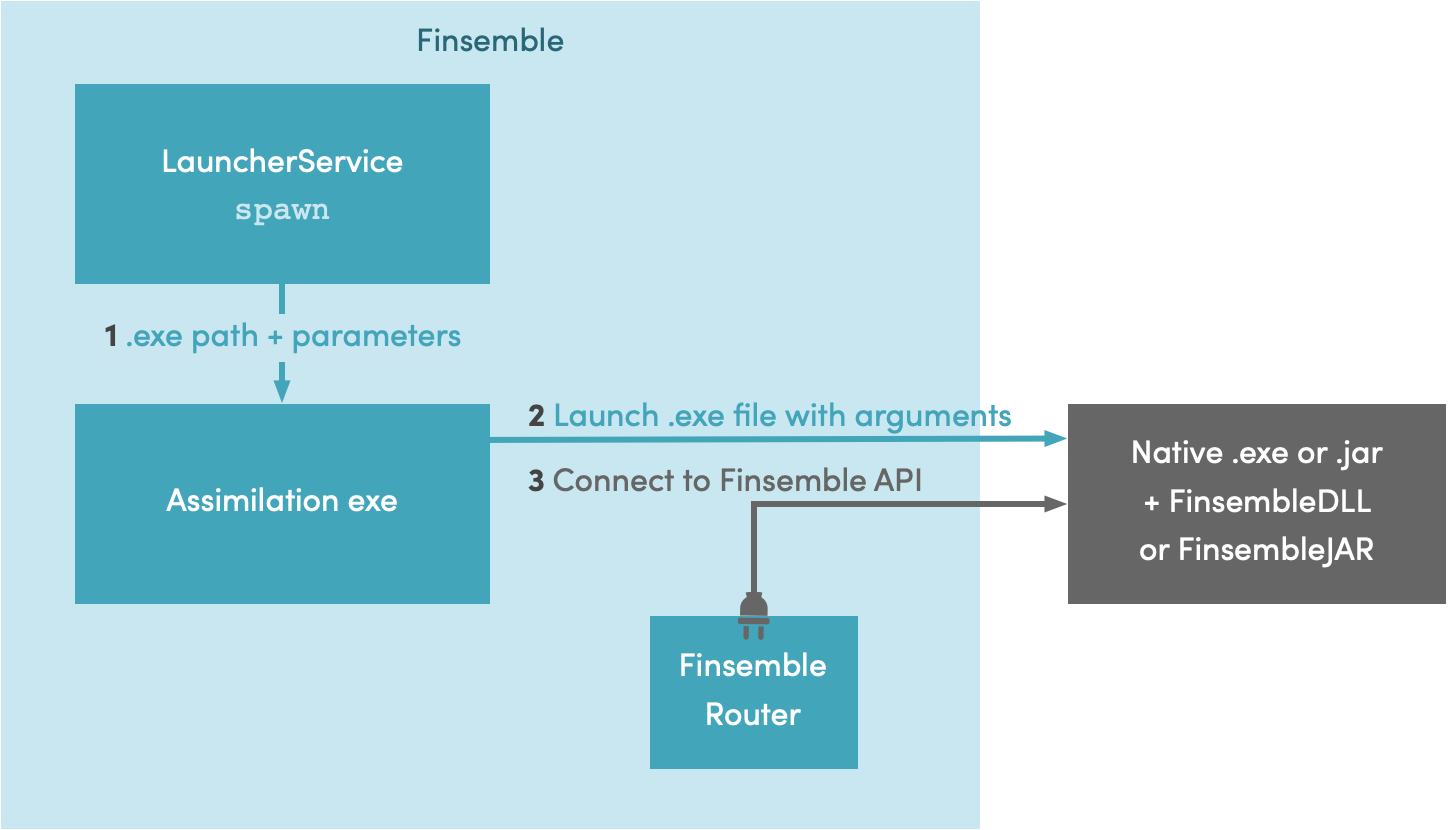
Now the assimilation process is simpler. We don't need to control the window size and position—there is no window! As a result, there is no need for WindowService either. Assimilation simply launches the app and it connects to the Finsemble router, just like before.
Here is an example of a windowless app.
The generic assimilation process we discussed in the previous section works for single-window apps that run within Finsemble and don’t need special consideration. But for some types of apps the process requires some additional finesse. These include freestanding, multi-window, and evergreen apps. Let’s now look at them in more detail and examine the tweaks in the integration process to handle the special needs of each type.
Finsemble recognizes several special types of native apps that require different consideration for assimilation:
![]() Note: Deciding which app to make evergreen is a judgement call. In general, if an app takes more than a few seconds to load, it’s a good candidate for making it evergreen.
Note: Deciding which app to make evergreen is a judgement call. In general, if an app takes more than a few seconds to load, it’s a good candidate for making it evergreen.
It is possible for an app to fit more than one type. For example, you can have a freestanding multi-window app, or any other such combination. The one exception is that a freestanding app can’t be evergreen (as they don't participate in workspaces).Now that we know about these different types of apps, let’s assimilate them.
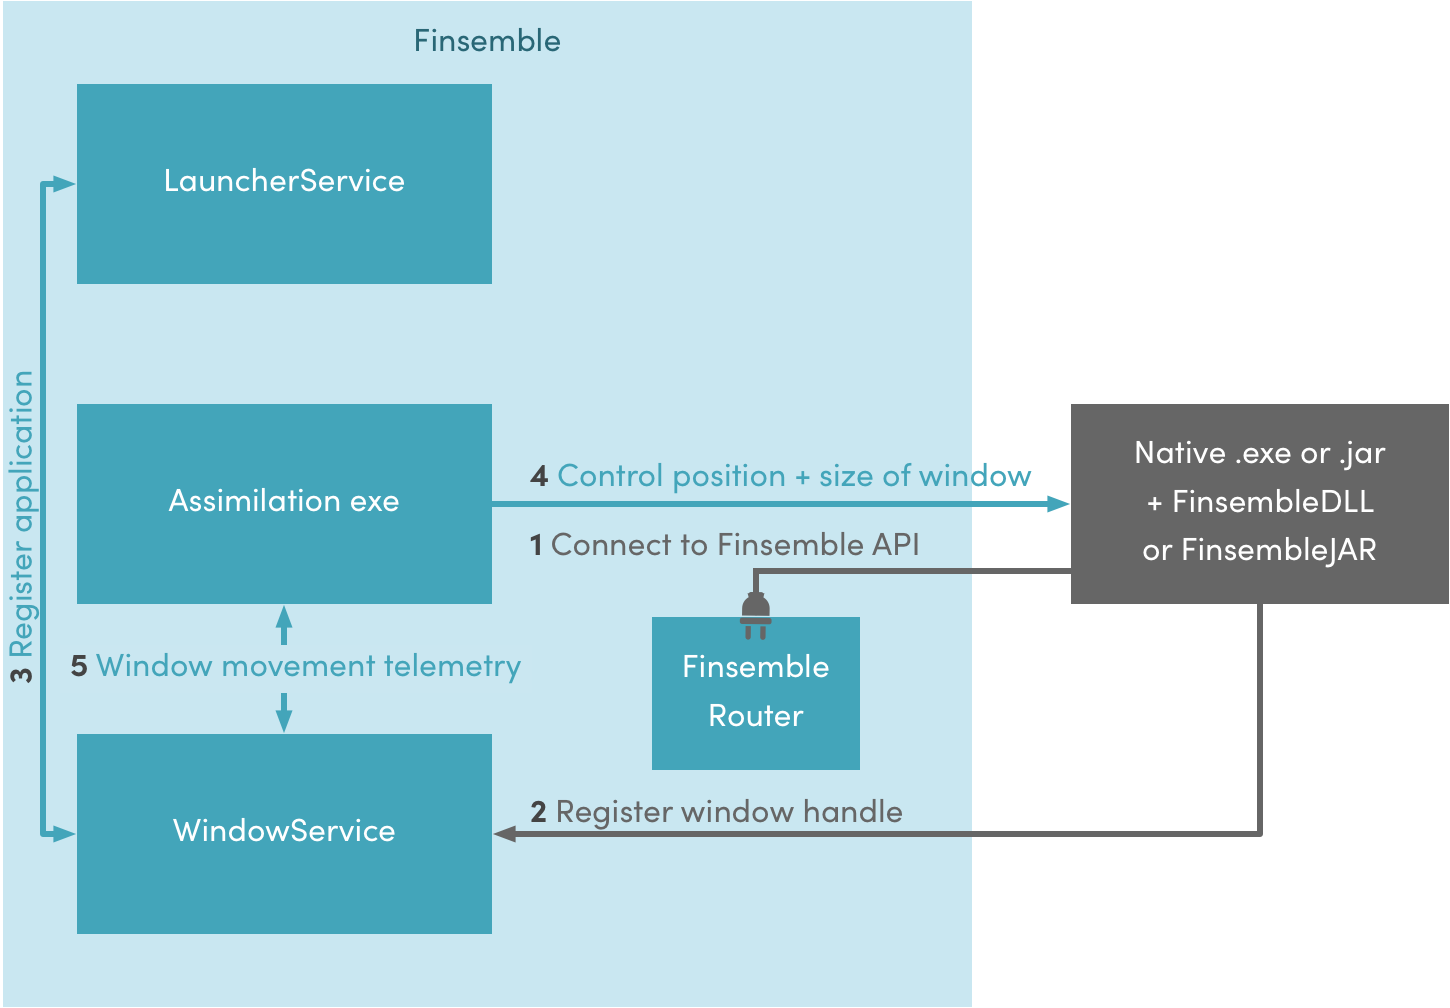
Although a freestanding app is launched outside of Finsemble, it can still use the Finsemble libraries to connect to the API. Here's the process:
![]() Note: Because Finsemble can't initialize a freestanding app, the workspace state is not supported.
Note: Because Finsemble can't initialize a freestanding app, the workspace state is not supported.
This is the most complex case we will look at. Individual windows can connect to Finsemble as apps, both freestanding or regular, or you can build the capability for Finsemble to launch your app’s individual windows into your application (which will allow them to participate in workspaces). Let's look at the diagram and examine the details.
Check out the full example.
The first time you launch an evergreen app, it will launch as if it’s not evergreen. In other words, you will use one of the processes we just described. (Most likely your evergreen app will be a single window, and you can use the general process described at the beginning. It could also be binary, and then the binary process applies.) The difference comes in when a user moves from a workspace in which the evergreen app is active to another workspace without that app.
Normally, Finsemble would close the app, and relaunch it when needed again. But there is another option. You can configure this app as evergreen. This way, when the user switches workflows, this app is hidden and the user isn't even aware that it is still running.
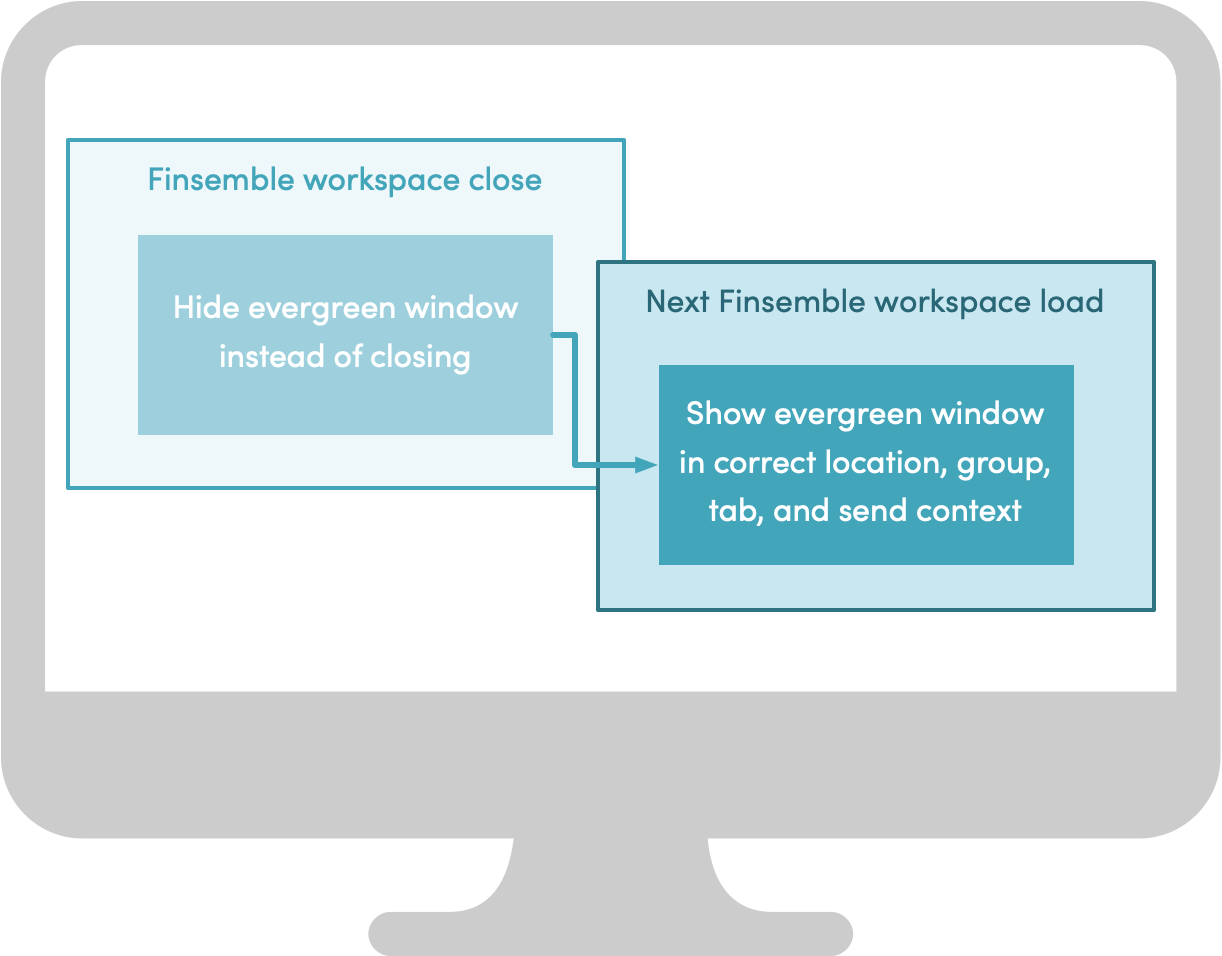
When the user switches to a workflow that includes the evergreen app, the app is ready. All Finsemble needs to do is restore its location, apply the grouping and tabbing states, and pass any state info saved in the workspace back to the application.
You can configure and launch native apps by using appD.json. You need to:
You can use one of the two available methods of launching the process: by path or by alias. In either case, to launch, you need to modify AppD.json.
Here is an example:
{
	...
	"appd": {
		"MyNativeApp": {
			"appId": "MyNativeApp",
			"name": "My Native App",
			"description": "An example native application",
			"manifest": {
				"window": {
					"windowType": "assimilation",
					"path": "C:/some/path/on/disk/mynativeapp.exe",
					"arguments": "mode=a --type b",
					"env": {
						"VAR": "value"
					},
					"width": 800,
					"height": 600,
					"top": "center",
					"left": "center"
				},
				"foreign": {
					"components": {
						"App Launcher": { "launchableByUser": true },
						"Toolbar": { "iconClass": "ff-settings" }
					}
				}
			},
			"version": "1.0.0",
			"tooltip": "My Native App",
			"images": [
				{
					"url": "http://someserver.com/my-native-app.png",
					"tooltip": "App screenshot"
				}
			],
			"contactEmail": "info@cosaic.io",
			"supportEmail": "support@finsemble.com",
			"publisher": "Cosaic",
			"icons": [
				{
					"url": "http://someserver.com/myNativeApp-icon.png"
				}
			]
		},
		...
To launch by path, you need to set the manifest.window.path argument to one of these:
myuri://myapp, which will cause a protocol handler to launch the app.Alternatively, you can launch your native app using an alias. To do so, you need to add an appAsset to your manifest file. The appAsset describes a zip file that contains your app so that Finsemble can use this information to download, install and launch the app for you.
Here’s the information you need to specify:
src - the location of the .zip file where your app residesalias - the name your appAsset will be known by. This is how components.json refers to your appversion - used for controlling updates. If you increase this number, the zip file will be re-downloaded on the next launch of Finsemble.target - the path to the binary within the .zip that you specified in the src.args - a default string of arguments passed in the same way as you would on the command prompt, such as “-mode=a b c”. (optional)Here’s an example app asset configuration:
{
    "appAssets":[
        ...
        {
            "src": "http://localhost:3375/example.zip",
            "alias": "NativeExample",
            "version": "1.0",
            "target": "example.exe",
            "args": "arg1 arg2"
        }
    ]
}
which is referred to in this app configuration:
{
	...
	"appd": {
		"MyNativeApp": {
			...
			"manifest": {
				"window": {
					"windowType": "assimilation",
					"alias": "NativeExample",
					...
				},
				...
By design, assimilation can handle one window per app. It observes the process it spawned and when it creates a window handle, it is automatically acquired. But some apps, such as the Microsoft Office suite, consist of multiple windows. Examples include the loading window (or splash screen) that the Microsoft Office Suite launches, or tool palettes and dialogs created by other applications. These windows are often short-lived and don’t participate in workflows. Therefore, this is not necessarily a serious limitation. All you need to do is decide which windows you want to include and which ones you want to exclude.
To help you achieve this we provide two configs, manifest.window.windowTitleWhiteList and windowTitleBlackList. Use windowTitleWhiteList to specify the name of the window that you want to finsemblize. Exclude windows that you don’t want to assimilate, such as loading windows, using manifest.window.windowTitleBlackList. Both fields take regular expression strings that contain match criteria for the window titles.
Here is an example for Outlook:
{
	...
	"appd": {
		"Outlook": {
			...
			"manifest": {
				"window": {
					"id": "Outlook",
					"name": "Outlook",
					"windowTitleWhiteList": ".*(Outlook|Today).*",
					"windowTitleBlackList": "Opening.*",
					"windowType": "assimilation",
					"path": "OUTLOOK.EXE",
                    "addToWorkspace": true
				},
				...
In this example, we use both the white list and the black list, but it’s not necessary to place every window of your app in one list or the other. In some cases it’s easier to specify only the black list, or only the white list. Either one will work. If you use only one list, any window that is not on that list is assumed to be on the other one.
![]() Note: If you use both lists and accidentally place an app on both, it’s the same as placing the app on the black list.
Note: If you use both lists and accidentally place an app on both, it’s the same as placing the app on the black list.
If you want to integrate a native app into Finsemble that is launched via an intermediary process, such as a batch script, launcher process or protocol handler registered with your operating system (e.g., myLauncher://myapp), you need to integrate the Finsemble DLL into the app so that it can register itself with Assimilation by passing in the window handle of its window(s).
When you use windowType: "assimilation", Finsemble Assimilation observes the process and captures the first window handle that it creates (that passes any windowTitleWhiteList or windowTitleBlackList set) and then begins managing that window. However, where an intermediary process launches the application, Assimilation can’t observe the creation of window handles. By integrating the Finsemble DLL into the application and using windowType: "native", the launched app can instead proactively register its window handle(s) with Finsemble Assimilation, bypassing this issue.
You can achieve a deeper level of integration when your native apps communicate with each other via Finsemble. This is called logical integration, and it allows users to create custom workflows between two or more interoperating apps.
Finsemble-aware native apps are specified with a windowType of native. As before, you can use a full path or an alias for a downloaded asset.
Here is an example:
{
	...
	"appd": {
		"MyNativeApp": {
			"appId": "MyNativeApp",
			"name": "My Native App",
			"description": "An example native application",
			"manifest": {
				"window": {
					"windowType": "native",
					"path": "C:/some/path/on/disk/mynativeapp.exe",
					...
				},
				...
			},
			...
		},
		...
To connect to Finsemble, you need to make sure that the window exists and that its handle is available. Let’s look at some examples in different languages. It is entirely up to you which language you choose. From the Finsemble perspective all work equally well.
For each of these examples, we provide you with a link to the complete code in GitHub.
Here is the ,NET WPF example.
    public MainWindow(string[] args)
    {
        // Trigger actions on close when requested by Finsemble, e.g.:
        this.Closing += MainWindow_Closing;
        //Make sure your window has been created (so that its window handle exists) before connecting to Finsemble.
        FSBL = new Finsemble(args, this); // Finsemble needs the command line arguments to connect and also this Window to manage snapping, docking etc.
        FSBL.Connected += Finsemble_Connected;
        FSBL.Connect();
    }
And here is the Winforms example:
public FormExample(String[] args)
{
#if DEBUG
System.Diagnostics.Debugger.Launch();
#endif
InitializeComponent();
//connect to Finsemble
//Ensure that your window has been created (so that its window handle exists)
//before connecting to Finsemble.
FSBL = new Finsemble(args, this);
// Use handle
// FSBL = new Finsemble(args, this.Handle);
ArrangeComponents();
FSBL.Connected += FinsembleConnected;
FSBL.Connect();
}
Let’s now try to connect with this Java Swing example:
private void initFinsemble() {
       fsbl = new Finsemble(launchArgs, this);
       try {
           fsbl.connect();
           appendMessage("Connected to Finsemble");

       fsbl.addListener(new ConnectionListener() {
           @Override
           public void disconnected(ConnectionEventGenerator from) {
               LOGGER.info("Finsemble connection closed");
               appendMessage("Finsemble connection closed");
           }

           @Override
           public void error(ConnectionEventGenerator from, Exception e) {
               LOGGER.log(Level.SEVERE, "Error from Finsemble", e);
           }

           @Override
           public void onWindowStateReady(ConnectionEventGenerator from) {
               // NoOp
           }
       });

       appendMessage("Window registered with Finsemble");

       initForm();
       setFormEnable(true);
   } catch (Exception ex) {
       LOGGER.log(Level.SEVERE, "Error initializing Finsemble connection", ex);
       appendMessage("Error initializing Finsemble connection: " + ex.getMessage());
       try {
           fsbl.close();
       } catch (IOException e1) {
           LOGGER.log(Level.SEVERE, "Error closing Finsemble connection", e1);
       }
   }

   }
And finally, here is the JavaFX example:
void connect() {
        if (fsbl != null) {
            // Has already connected once, and reconnecting doesn't work.
            return;
        }

    // the following statement is used to log any messages
    LOGGER.info(String.format("Starting JavaExample: %s", String.join(", ", args)));

    fsbl = new Finsemble(args, window);
    try {
        fsbl.connect();
        appendMessage("Connected to Finsemble");

        fsbl.addListener(new ConnectionListener() {
            @Override
            public void disconnected(ConnectionEventGenerator from) {
                LOGGER.info("Finsemble connection closed");
                appendMessage("Finsemble connection closed");
            }

            @Override
            public void error(ConnectionEventGenerator from, Exception e) {
                LOGGER.log(Level.SEVERE, "Error from Finsemble", e);
            }

            @Override
            public void onWindowStateReady(ConnectionEventGenerator from) {
                // NoOp
            }
        });

        appendMessage("Window registered with Finsemble");
If you already worked with web apps and Finsemble, you’ll be happy to know that all of the APIs follow the same pattern as the JavaScript APIs. The syntax for accessing each API client is slightly different, but once you know the pattern, it's easy to follow. Let’s take a look at an example of the same call in 3 different languages. In our example, we define the context and then broadcast it.
Here’s our example using JavaScript:
let context = {
   type: "fdc3.instrument",
   name: "Tesla, Inc.",
   id: {
       ticker: "TSLA"
   }
}
fdc3.broadcast(context);
Here’s the same call using .NET:
JObject context = new JObject
{
	["type"] = "fdc3.instrument",
	["name"] = "Tesla, Inc.",
	["id"] = new JObject
	{
		["ticker"] = "TSLA"
	}
}
FSBL.FDC3Client.fdc3.broadcast(context);
And finally, here is the same example in Java:
Context context = new Context();
context.setType("fdc3.instrument");
Map<String, Object> contextId = new HashMap<>();
contextId.put("ticker", "TSLA");
context.setId(contextId);
context.setName("Tesla, Inc.")
FinsembleDesktopAgent finsembleDesktopAgent = new FinsembleDesktopAgent(fsbl);
finsembleDesktopAgent.broadcast(context);
Important: When your apps don’t communicate as expected, authorization could be the problem. See Controlling information flow with selectConnect for more information.
For the most part, Java applications have parity with the JavaScript API. The Java API clients follow a paradigm appropriate for that language: they are accessed at FSBL.getClients().getClientName().method, e.g., FSBL.getClients().getLauncherClient().getComponentsThatCanReceiveDataTypes.As examples, we've made a few Java sample projects.
You can integrate .NET applications by using our .NET library, finsemble.dll. As examples, we've made a few .NET sample projects.