Upgrading Finsemble
Should you upgrade?
If you’re considering whether to upgrade, the answer is yes. In fact, the earlier version you have, the more important it is to upgrade. There are several reasons for this recommendation:
- New features. The later versions often have features you need but currently don’t have.
- Bug fixes. An upgrade can contain bug fixes.
- Security vulnerabilities in dependencies. Dependencies are audited and security vulnerabilities addressed in each release.
- Security and bug fixes for Electron. Finsemble upgrades almost always include a newer Electron version, which contains security and bug fixes for chromium, node.js, and Electron itself.
The other important question is when to upgrade. That depends on what version of Finsemble you’re running. The earlier your version, the longer it takes to upgrade. We strive to make the upgrade as easy as possible, but realistically, it does take some time. For this reason, we recommend that you set aside some time for performing the upgrade. For patch releases, it will go faster. For minor releases, it’s a medium effort. Upgrading to a major release could be complex.
If you highly customized your installation, it might take more work to upgrade. As always, following the industry standard practices makes it easier to perform upgrades.
The path to upgrade
Each upgrade depends heavily on the Finsemble version immediately before it. For this reason, there is no direct path that spans multiple upgrades at one step. For example, you can’t go directly from 5.3 to 6.0. The correct way is to first upgrade from 5.3 to 5.4 and then from 5.4 to 6.0.
In general, we recommend that you upgrade in steps, applying each set of instructions in turn. This way, you can be sure you upgraded correctly and didn’t miss anything.
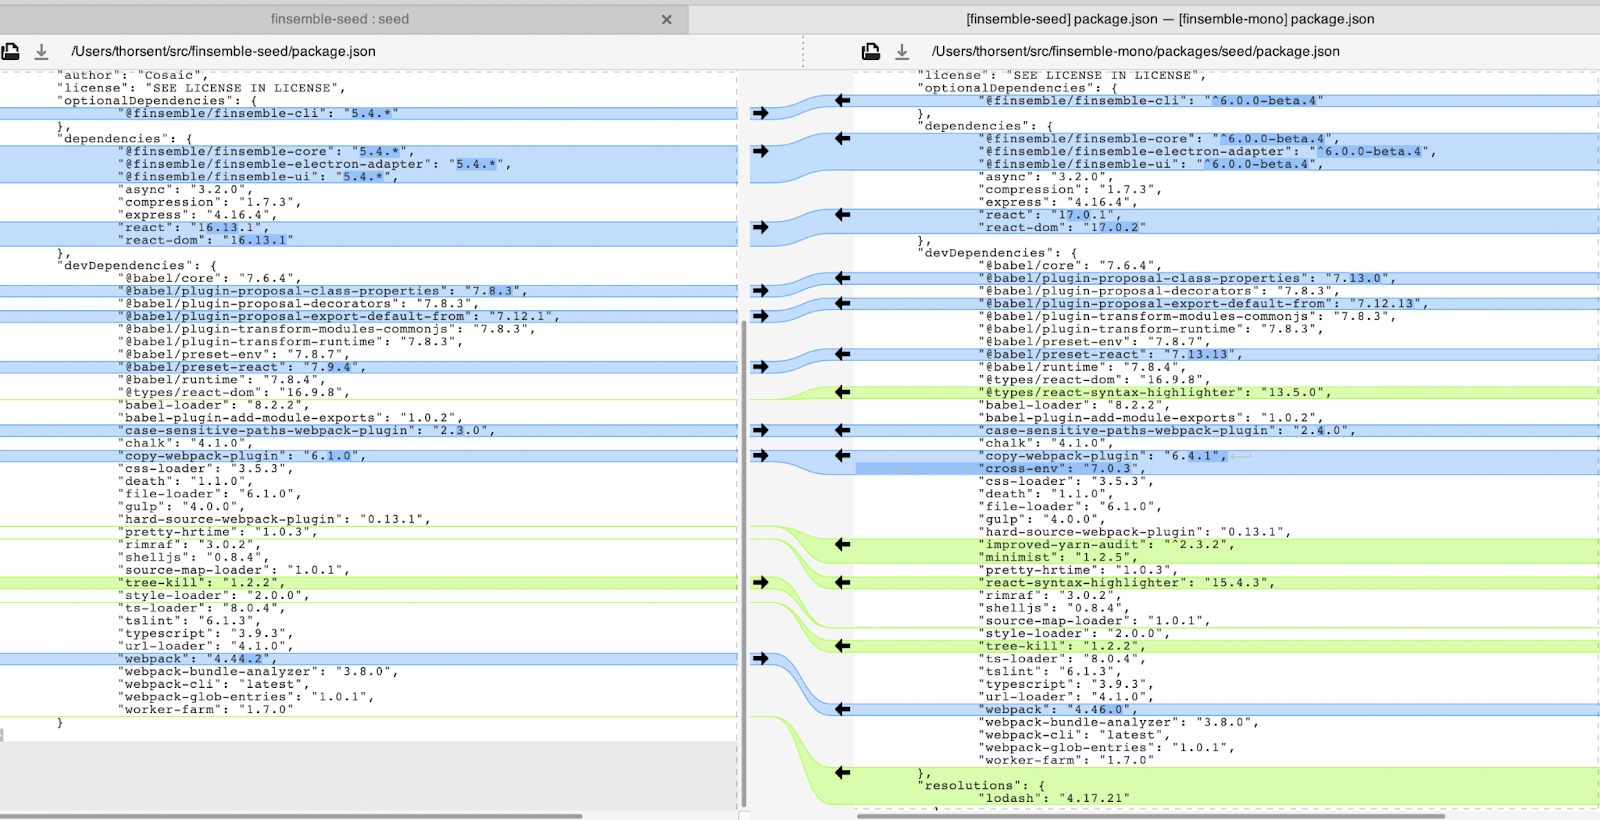
There is a quick way to see what changed. To compare files in GitHub, use this URL: https://github.com/ChartIQ/finsemble-seed/compare. Choose the version that you are running (such as 6.6) and GitHub will show you all the changes.
The basic upgrade process
- Update the version number for
@finsemble/finsemble-corein package.json. - Follow the instructions specific to this upgrade, if any.
- Rebuild:
yarn installandyarn start
Example package.json entry:
...
"dependencies": {
    "@finsemble/finsemble-core": "8.0.0",
}
This is also a good time to update any of your own dependencies. For more info, see Update dependencies.
We recommend checking the Central Logger for any errors after upgrading. If Finsemble starts without any errors then you are ready to deploy. See Updating your deployed smart desktop.
Deprecated features
When API and other features become deprecated, you need to update your code to remove those features. Although the deprecated features still work, they might go away in the next version. It’s best to take the time and remove them now so that your next upgrade will be easier. You'll see error messages in the central logger if Finsemble detects code that is using deprecated features.
Check for vulnerabilities
We recommend that you check for any known vulnerabilities in dependencies each time you do an upgrade. We recommend yarn audit or improved-yarn-audit. These produce a list of packages that have vulnerabilities rated high (8) or critical (16). You can run this in your normal CI workflow. We recommend that as a part of your upgrade process you resolve any issues you find. To resolve the issues you can use any of your normal methods to upgrade. One such method is yarn upgrade-interactive.
Verify your apps
We recommend that you periodically review your installed apps to verify that you still need them. If there are apps on your apps menu that nobody uses and likely never will, remove them to reduce the complexity of your smart desktop.
If you run into trouble
Contact us if you have any problems upgrading: support@finsemble.com.
Rolling back a release
Typically upgrades go forward well, but sometimes you might discover that things don’t go as planned. The first thing you should do is to try to resolve the issue. But that’s not always possible. For example, you might discover a bug that wasn’t there in the previous version and that is severe enough that it’s stopping the users from achieving what they need to do. In such situations you can’t wait for the fix. If this occurs, a rollback might be your best option.
We recommend that you do your best to resolve the issue first. A rollback is always the option of last resort.
When you decide to roll back a release that you have already rolled out to your users, you need to do this in a way that minimizes the impact on users who have already upgraded. Depending on your situation, this might include all of your users, or just a handful of people. Either way, the process is the same.
You already know that we recommend a specific file structure for your Finsemble installation (see A strategy for reliable upgrades and rollbacks). If you follow our recommendation about file structure and keep separate folders for minor and major upgrades, rolling back a release will be easier. If you don’t, now is the time to move to the recommended structure.
Incidentally, if you ever wondered why we recommend this specific file structure, here is why. Every version of Finsemble core should use the corresponding Finsemble Electron Adapter (FEA). The reason for this is that the way FEA communicates with the core might change, so we really want to keep the two in line. One of the main reasons we recommend the folder structure is so that each version of core (server deployed code) talks to the correct version of the FEA. The folder structure helps to ensure that upgrades work seamlessly. But a rollback is the reverse of an upgrade, so the same reasoning applies here as well.
With this in mind, if the rollback doesn’t involve a Finsemble version change, deploying the previous version's assets, such as 1.1.0, over the current folder's assets, such as 1.2.0, should work for you. If the rollback is across Finsemble versions, we don't recommend deploying the 1.1.0 code to the 1.2.0 folder. In practice, it is a bit safer to overwrite the folder if you are rolling back a patch version because it's unlikely for there to be changes in the communication between FEA and the Core. But the risk is never zero.
Finsemble's auto update mechanism doesn't support going back in version numbers. Therefore, we recommend that you create an upgrade using an older version's code. The most straightforward way is to create a new build using the old 1.1.0 git hash and bumping the number to 1.3.0.
If this is not possible, you can create a new release manually from an older file. It won’t really be new, but it will be treated as new. You could do this by making a copy of the version [name]-[versionnumber]-full.nupkg file, renaming it with the next release and updating the RELEASES file manually.
For example, let’s again assume we are rolling back from 1.2 to 1.1.0. Your RELEASES file might look like this:
ECDAFE837C38265E7781A198AB81B097FD72F322 finsemble-1.1.0-full.nupkg 98473508017B8D3ADB661C7F6CD8790444A4196DE2276C02 finsemble-1.2.0-delta.nupkg 6675536153527327EFC84DC71E292E3B9BA92C9AC32118F0 finsemble-1.2.0-full.nupkg 98472861
Copy and rename the finsemble-1.1.0-full.nupkg file to finsemble-1.3.0-full.nupkg. Duplicate the finsemble-1.1.0-full.nupkg line keeping the hash and file size while updating the file name. In our example, you will end up with a RELEASES file that looks like this:
ECDAFE837C38265E7781A198AB81B097FD72F322 finsemble-1.1.0-full.nupkg 98473508017B8D3ADB661C7F6CD8790444A4196DE2276C02 finsemble-1.2.0-delta.nupkg 6675536153527327EFC84DC71E292E3B9BA92C9AC32118F0 finsemble-1.2.0-full.nupkg 98472861ECDAFE837C38265E7781A198AB81B097FD72F322 finsemble-1.3.0-full.nupkg 98473508
Don't forget to incorporate this RELEASES file back into your build process as you normally would.
Additionally, rolling back on a Finsemble version could mean you are also changing an Electron version. This is much less likely on a patch version. Older versions of Chromium sometimes have problems reading the cache from new versions. This has not been the case in recent releases, but just in case, we recommend that you clear the Electron cache in %AppData% after.
One other thing to consider is Finsemble data, including workspaces, favorites, and the like. Finsemble data are compatible across minor versions and so rolling back should not be an issue. In general, we try to keep this compatible across major versions. You will find any incompatibilities in the changelog.
If you run into trouble with your rollback process, contact support@finsemble.com.
Upgrading from 8.9 to 8.10
To upgrade from Finsemble 8.9 to 8.10, follow the instructions in the Basic upgrade process section earlier in this topic.
Upgrading from 8.8 to 8.9
To upgrade from Finsemble 8.8 to 8.9, follow the instructions in the Basic upgrade process section earlier in this topic.
Upgrading from 8.7 to 8.8
To upgrade from Finsemble 8.7 to 8.8, follow the instructions in the Basic upgrade process section earlier in this topic.
Upgrading from 8.6 to 8.7
To upgrade from Finsemble 8.6 to 8.7, follow the instructions in the Basic upgrade process section earlier in this topic.
One change that might affect some customers is that in this release Finsemble has upgraded to React 18. This impacts you if you have custom apps, components, or customized UI components built using a template. Specifically:
- You have a custom component living in the Seed, and that component was built using a React version 17 or earlier.
- You used
yarn templateto generate a UI component for customization. These templates were built using React 17.
If one of these applies to you, after you upgrade to 8.7, you may start seeing these warning messages in the Central Logger:
Warning: ReactDOM.render is no longer supported in React 18. Use createRoot instead. Until you switch to the new API, your app will behave as if it's running React 17. Learn more: https://reactjs.org/link/switch-to-createroot
This is a harmless warning from the react team meant to encourage people to move to their preferred syntax. Other than the message, Finsemble behaves normally and you shouldn't see any problems in your apps. However, if you want the error message to go away, you must update your apps or components to use React 18. This is usually a 2-3 line change.
With version 8.7, react and react-dom have been added back to finsemble-seed's package.json file and set to version 18.2.0. In most cases, Finsemble's CLI will still compile and bundle your apps correctly even if you don't specify these dependencies but setting the dependencies explicitly will ensure proper compilation.
If you need to continue using react 17 for your apps, set these entries to the version you require. Finsemble is still compatible with react version 17.x. Note however that as of 8.7, the template command installs React 18 compatible templates that use the syntax described below. If you are still using react 17.x then you will need to reverse this syntax, to use ReactDOM.render.
In most cases you'll take code that looks like this:
import React from "react";
import ReactDOM from "react-dom";
import MyApp from "./app";

...

const container = document.getElementsByTagName("div")[0];
ReactDOM.render(<MyApp />, container);
and transform it to this:
import React from "react";
import { createRoot } from "react-dom/client";
import MyApp from "./app";

...

const container = document.getElementsByTagName("div")[0];
createRoot(container).render(<MyApp />);
See React's upgrade guidelines for more information about React 18.
npm and yarn behave differently when it comes to installing react and react-dom. When running yarn install on finsemble-seed, the latest versions of react and react-dom will be installed at the root of nodemodules. When running npm install, the _lowest versions will be installed at the root level. If you're using npm and do not change the imports, and do not add react-dom to your package.json, then your apps will end up being built with react version 17.0.2 and you will see warnings in your apps' consoles. This is fine, Finsemble is compatible with react 17. Making the above changes will eliminate the warning and cause your apps to be built with react version 18.2.0.
Upgrading from 8.5 to 8.6
To upgrade from Finsemble 8.5 to 8.6, follow the instructions in the Basic upgrade process section earlier in this topic.
Upgrading from 8.4 to 8.5
To upgrade from Finsemble 8.4 to 8.5, follow the instructions in the Basic upgrade process section earlier in this topic.
Upgrading from 8.3 to 8.4
To upgrade from Finsemble 8.3 to 8.4, follow the instructions in the Basic upgrade process section earlier in this topic.
One important change in version 8.4 is a rewrite of Finsemble's WindowTitleBar, which is the header that appears above each app’s window. Light customizations to your WindowTitleBars, such as adding or removing React components, should be entirely compatible. However, because the WindowTitleBar's underlying DOM and CSS have changed, if you have customizations that modify or depend on specific internal DOM elements, these could break. Also, CSS changes that rely on classes or attributes outside of theme.css could require adjustment.
We recommend that you check with the Finsemble support team if you've made any complex customizations. We can verify that your code will continue to operate as expected.
Upgrading from 8.2 to 8.3
To upgrade from Finsemble 8.2 to 8.3, follow the instructions in the Basic upgrade process section earlier in this topic.
In addition, FDC3 2.0 includes an updated format for App Directory records which you can find in its Open API documentation for apps. Finsemble has adopted this new format as its preferred format for app definitions under the finsemble.apps config property and config file public/configs/application/apps.json. As a result, the existing finsemble.appd property (which conforms to FDC3 1.2) and the public/configs/application/appd.json config file are deprecated.
When Finsemble starts, any applications configured under the deprecated finsemble.appd property, will be automatically updated to the new format and migrated to finsemble.apps. Whenever this automatic migration occurs and Finsemble is running in the dev mode, it displays a toast notification.
If you are using the Finsemble Smart Desktop Designer (SDD), a dialog appear when you open the SDD, offering to update your project to the new format.
To help Finsemble Seed project users to update, we've provided two new CLI commands. First, to automatically migrate any existing apps configured under finsemble.appd to the new finsemble.apps schema in our default config files, run:
npx finsemble migrate-to-8-3- This command reads app definitions from public/configs/application/appd.json, updates them to the App Directory 2.0 record format under
finsemble.apps, renames the file to public/configs/application/apps.json and changes theimportConfigentry in public/configs/applications/config.json to import the new apps.json file.
However, if you also or only use Dynamic Config to add your app definitions to Finsemble, we've also provided a command to migrate other config files:
npx finsemble migrate-to-appd2 <filename>.- This command updates the specified file in place, migrating any
finsemble.appdproperties tofinsemble.appsand then removingfinsemble.appd. To be safe, we keep a copy of the file that was updated, but with a prefix of “original-”. For example, we save appd.json as original-appd.json.
- This command updates the specified file in place, migrating any
If you keep your app definitions in a database or other repository, you can add them to a file, (in the appd.json format under finsemble.appd, to migrate them.
The existing app configuration under finsemble.appd still works and is automatically converted to the new format for you. Hence, migration is optional but we recommend it because the new format will be required in future.
Finsemble 8.3 also includes Finsemble's FDC3 2.0 API implementation. See the Finsemble changelog for more details on what's changed.
Finsemble's FDC3 2.0 implementation is backwards compatible with FDC3 1.2. It provides both synchronous AND asynchronous responses to the updated API calls, as well as support for all the deprecated API signatures from FDC3 1.2. Hence, code written for FDC3 1.2 will work as it did before without modification, while newer code can target FDC3 2.0. No configuration is required.
Upgrading from 8.1 to 8.2
To upgrade from Finsemble 8.1 to 8.2, follow the instructions in the Basic upgrade process section earlier in this topic.
Upgrading from 8.0 to 8.1
To upgrade from Finsemble 8.0 to 8.1, follow the instructions in the Basic upgrade process section earlier in this topic.
Upgrading from 7.x to 8.0
In Finsemble 8.0 we have redesigned our approach to the finsemble-seed, which has always been the starting point for building a smart desktop. You will still use the finsemble-seed, but it is now a lot smaller. A number of files that used to be a part of the seed have now moved into Finsemble's core library.
We made this change to:
- reduce future upgrading effort;
- make the seed project compatible with our Smart Desktop Designer GUI,
- simplify the developer experience when working with the seed.
What changed in Finsemble 8.0 seed
You can see all of the changes in this diff on github.
Here are the specific changes to the 8.0 seed:
- Most files that have been removed from the seed. Some are gone, some were moved elsewhere. These include several JSON config files (such a UIComponents.json), webpack configuration scripts (such as webpack.vendor.js), template files (such as Toolbar.tsx), storage adapters, preloads, a gulpfile, gulpfile extensions, and tsconfig.json.
- Dependencies have been removed. package.json now includes only a single dependency, @finsemble/finsemble-core.
- package.json scripts have changed. Finsemble now ships with a built in CLI that handles all of the functionality that previously was handled by the seed's gulpfile. This includes building components and starting Finsemble. The old CLI has been deprecated and will be removed in a future version.
Upgrade steps
Many of the steps call for moving your existing customization source code into new files and folders. The examples we give create a flat structure but this is not required for Finsemble to work correctly.
When you need to compare files, we recommend that you use VSC's split editor or comparison tool.
Before you begin, make sure to delete node_modules and the public/build folder.
Running the migration script
We have provided a migration script to ease the transition from 7.x to 8.x. The migration script automates most of the manual steps outlined below.
The migration script will irreversibly modify your seed project. Please make a backup of your project before proceeding (or use reversible source control such as git.)
Important considerations:
1) Customized webpack configuration (other than adding entries). For instance, if you've added or modified webpack rules or added code via the gulpfile then you may need to re-implement those changes after running the migration script by creating a custom webpack build. See Customizing the build process.
2) The migration script results in a src directory that is very similar to the previous Finsemble structure, while the manual steps below will result in a src directory that looks like the new structure. This doesn't affect the behavior of Finsemble. You can feel free to rearrange the folder structure after running the migration script if desired.
3) Finsemble's UI components, preloads and storage adapters are now automatically bundled with @finsemble/finsemble-core and can be referred to using the $moduleRoot manifest macro. This is now the default for Finsemble's seed project. However, the migration script does not remove these from your project because it cannot tell if you have customized them or not. Once completing the migration script, we recommend removing any components, preloads or storage adapters that you haven't customized. You can follow the manual steps below to do this (essentially, replacing $applicationRoot with $moduleRoot in config, removing them from webpack/entries.json, and then deleting the source code.)
4) The migration script removes all package.json dependencies. The previous seed required many dependencies. The new seed doesn't require any. If your code requires its own dependencies then you will need to add them back to package.json after completing the migration script.
To run the migration script:
- Delete your node_modules directory
- Change your package.json entry for
@finsemble/finsemble-coreto version "8.0.2" - Remove your package.json entry for
@finsemble/finsemble-electron-adapter - Run
yarn install(ornpm install) - Run
npx finsemble migrate
The migration script will tell you each step it is doing and then give you an option to execute or skip that step. Press 's' to skip a step, or any other key to execute the step.
When the migration is complete you should be able to run yarn dev to start Finsemble. If you encounter any errors please refer to the manual instructions below or reach out directly to our support team so that we can assist.
Building
Webpack, Typescript and React are now bundled with the framework, so you don't need to install these dependencies directly. @finsemble/finsemble-core now directly compiles Webpack and Typescript via a new CLI (npx finsemble). Running yarn dev runs the seed project's build process, compiling any templates that were installed using yarn template.
It's okay to add "react" and "react-dom" as dependencies. Finsemble's build process always uses your installed dependencies before defaulting to its own bundled dependencies. At this time, we don’t support React 18.
You can add any dependencies that you need for your apps or customizations. Use yarn add or npm install or modify package.json as you would in any other project.
Finsemble now also ships with a default tsconfig-seed.json file and automatically applies this file when running the build, but Visual Studio Code (VSC) doesn't automatically pick it up. To fix this, copy node_modules/@finsemble/finsemble-core/dist/platform/tsconfig-seed.json into your project root and rename it "tsconfig.json".
When running the build command, if your seed project contains a tsconfig.json, this file will be used instead of the one in the package.
To migrate to 8.0:
- Replace package.json with the new one from the finsemble-seed repo. Note any dependencies that you've added for your own apps, services, or adapters.
- Add back any of your necessary dependencies.
- Delete your node_modules directory and run
yarn install. - Delete the webpack folder unless you've customized the webpack process.
- Delete gulpfile.js and gulpfile-extensions-example.js. If you've made modifications to the gulpfile, you might need to re-implement them elsewhere. Contact us if you need help with this.
- Delete tsconfig.json (or, optionally, replace its content with
node_modules/@finsemble/finsemble-core/dist/platform/tsconfig-seed.json. See note above about VSC.)
UI components
Finsemble's internal UI components (such as Toolbar, UserPreferences, Dialogs) were previously built (compiled) directly in the seed project. Now, they are pre-built and included in @finsemble/finsemble-core. This means that you can now launch Finsemble without any build step.
In the earlier versions of Finsemble, UI components were referenced in /public/configs/application/UIComponents.json. That file has moved into @finsemble/finsemble-core and modified to point to Finsemble's internal pre-built UI components. The URLs for UI components now look like this: $moduleRoot/ui-components/Toolbar/index.html (consistently capitalized and index.html is always an entry point.)
You can still customize UI components such as the Toolbar or WindowTitleBar. To do so, you run yarn template <component> (where <component> is the name of the UI component you want to customize). This command adds a src/<component> folder to your project, creates a webpack/entries.json file, and adds a components.Toolbar entry to config.json. Keep in mind that these steps override Finsemble's built-in UI component. Customization of the template's source code is exactly the same as previous releases (see notes later in this topic).
To migrate to 8.0:
- Delete any components that have not been customized, and delete their references in /public/configs/application/UIComponents.json.
If you are unsure which components have been customized you can run a diff of your project versus the 7.3.x seed project
Run
yarn template <component>for each of the components that you have customized. When customizing our internal components via template, you must use PascalCase. We also recommend that you use PascalCase for all of your component names. Runyarn templateto get a list of available templates.Cut the source code for your modifications and paste it into the index.tsx files that were generated. Note that the boilerplate for these files may have changed from when you initially made your customizations. Contact us if you have any trouble merging.
Code from the Toolbar's FileMenu.tsx file has been relocated into index.tsx.
- If necessary, modify the /public/configs/application/config.json entries that were generated for each template by cutting and pasting any of your config customizations from /public/configs/application/UIComponents.json.
- Delete /public/configs/application/UIComponents.json and the remaining old source code.
- In /public/configs/application/config.json, remove the
importConfigentry for "UIComponents.json".
Storage adapters
You add a storage adapter by using the command yarn template StorageAdapter. This command adds a src/StorageAdapter folder and index.tsx file.
To migrate to 8.0:
Change the dataStoreAdapter entries for LocalStorageAdapter and IndexedDBAdapter in /public/configs/application/config.json from $applicationRoot to $moduleRoot.
These entries
"LocalStorageAdapter": "$applicationRoot/adapters/localStorageAdapter.js",
"IndexedDBAdapter": "$applicationRoot/adapters/indexedDBAdapter.js",
must be changed to:
"LocalStorageAdapter": "$moduleRoot/adapters/localStorageAdapter.js",
"IndexedDBAdapter": "$moduleRoot/adapters/indexedDBAdapter.js",
To migrate a custom storage adapter to 8.0:
Run
yarn template StorageAdapter.Cut your custom storage adapter code and paste it into the src/StorageAdapter/index.tsx file that was generated.
The StorageAdapter template is a Typescript file that is based on our latest template which includes queuing. If your code is based off of an older template then copy the inside of your function. Copy everything between baseStorage.call(...) and the end of your adapter function.
If you're getting a lot of Typescript errors you can either migrate the types from the template or you can opt out of Typescript by adding // @ts-nocheck to the top of your file.
Give the template your storage adapter's name by changing this line new (StorageAdapter as any)("StorageAdapter"); to match your existing code.
Example
new (StorageAdapter as any)("StorageAdapter");
could change to:
new (StorageAdapter as any)("MyCustomStorageAdapter");
- Modify the
dataStoreAdaptersentry in /public/configs/application/config.json. New entries were added when you ranyarn template StorageAdapter. These can be deleted. YourdataStoreAdaptersentry should look like this:
"dataStoreAdapters": {
  "LocalStorageAdapter": "$moduleRoot/adapters/localStorageAdapter.js",
  "IndexedDBAdapter": "$moduleRoot/adapters/indexedDBAdapter.js",
  "MyCustomStorageAdapter": "$applicationRoot/StorageAdapter/index.js"
}
Be sure that the entry for your custom adapter points to the $applicationRoot/StorageAdapter/index.js file:
Example:
"MyCustomStorageAdapter": "$applicationRoot/StorageAdapter/index.js"
- Delete the
/src/adaptersfolder along with your prior storage adapter code.
Custom services and app services
While you could compile custom services by manually adding a webpack entry as described in the UI components section, we recommend that you convert services to app services instead. App services are apps that run invisibly in the background. They provide all the same functionality as custom services but are easier to build and are compatible with Finsemble's Smart Desktop Designer.
App services are not new in Finsemble 8. If you have already migrated your custom services to app services in an earlier upgrade, all you need to do is add them to the entries.json so that they can be built.
To migrate existing app services to 8.0:
Add an entry to /webpack/entries.json (create the file if it doesn't exist) which points to the entry point for your service.
["./src/components/myService/myService.ts"]
or, to control the output location:
[{
  "import" : "./src/components/myService/src/myService.ts",
  "filename" : "components/myService/myService.js"
}]
Convert a service to an app service:
Alternatively, you can follow these steps if you want to convert your service to an app-service. See App services for more info.
Run
yarn create-app YourServiceNamewith the name of your service.Cut your service code and paste it into src/YourServiceName/index.ts making adjustments as needed.
We recommend app services over legacy services because of the improvements in code simplicity and consistency app services have over legacy services. App services now use the FSBL object the same way as normal apps do. There is no longer a need to initialize clients and no need to import the Finsemble object.
// Legacy service
readyHandler(callback) {
    Finsemble.Clients.WindowClient.spawn(...)
    callback();
}

// app service
FSBL.Clients.WindowClient.spawn(...)
FSBL.publishReady();
Add an /public/configs/application/appd.json entry that points to src/YourServiceName/index.html. Be sure to set
manifest.appService : truein the entry.If you just converted to an app service, remove your services entry in /public/configs/application/services.json.
Here is an example AppD entry for a custom app service:
"YourServiceName": {
    "name": "YourServiceName",
    "appId": "YourServiceName",
    "manifest": {
        "appService": true,
        "window": {
            "url": "$applicationRoot/YourServiceName/index.html"
        }
    }
}
- Remove the old files for the service you converted.
Using legacy services:
- Add an entry to /webpack/entries.json (create the file if it doesn't exist) which points to the entry point for your service.
- Move the entry for your service in /public/configs/application/services.json into config.json.
Finish:
By this point you should have cleared all entries out of services.json. It is safe to remove this file.
If you've cleared out the src/services folder, you can remove it too.
Custom apps
You can still add your own apps to the seed project and use Finsemble's build process. Of course, you will need to add any dependencies your apps use.
Finsemble automatically generates index.html files later when you run yarn dev or yarn build. If your app requires custom html, add your own index.html or other html file.
If you have any custom app entries in /configs/application/components.json, first migrate them to AppD format in /configs/application/appd.json. Contact us if you have any questions about how to do this.
Remove any references to <script src="../../vendor.bundle.js"></script> in your app's html. Finsemble no longer generates a vendor bundle.
To migrate custom apps to 8.0:
- Add an entry to /webpack/entries.json (or create the file if it doesn't exist) which points to the entry point for your app.
["./src/components/myApp/myApp.tsx"]
Add // @ts-nocheck to the top of your file if you're converting from JavaScript and getting a lot of type errors.
Change any imports from @finsemble/finsemble-ui to the root of @finsemble/finsemble-core. For example, change this import:
import { Menu } from "@finsemble/finsemble-ui/react/components/menu";
to:
import { Menu } from "@finsemble/finsemble-core";
finsemble.css can now be imported from "@finsemble/finsemble-core/dist/platform/assets/css/finsemble.css".
- Add or modify your /public/configs/application/appd.json entry that points to your app.
"YourAppName": {
    "name": "YourAppName",
    "appId": "YourAppName",
    "manifest": {
        "window": {
            "url": "$applicationRoot/YourAppName/index.html"
        }
    },
    "foreign": {
        "components": {
            "App Launcher": {
                "launchableByUser": true
            }
        }
    }
}
- Remove your old app code. Remove the src/components folder if you have removed all of your own custom components and there are no remaining customizations in Finsemble's built-in UI components to migrate.
Preloads
You add custom preloads just like you add apps but using yarn create-preload.
When updating the config, be sure to update all the preload entries for the apps in which you use this preload. If you use global preloads, you need to update their path as well.
For Finsemble's built-in preloads such as zoom.js and nativeOverrides.js, change any preloads entries in config to point to $moduleRoot/preloads/zoom.js (instead of $applicationRoot). You can then delete the src/preloads folder.
Customizing the build process
Finsemble comes with build tools available as an import, so you can easily modify the webpack configuration. To customize the build, you bypass the package.json scripts.
To migrate to 8.0:
- Follow steps in the Customizing the build process tutorial.
- Delete the old webpack folder.
Config
All config should now be entered in either /public/configs/application/manifest-local.json, /public/configs/application/config.json or /public/configs/application/appd.json.
The importConfig is still supported but we don't recommend that you use it.
Config that was formerly in dashbarConfig.json, securityPolicies.json, services.json, smartDesktop.json, UIComponents.json, and workspaces.json have all been moved into Finsemble's core library. You can move any changes that you've made in these files into config.json and place them at the same level as toolbarMenus. Changes in config.json override the defaults from Finsemble's core config.
To migrate to 8.0:
- Move any customized config entries out of the other files and into
/public/configs/application/config.json.
If you are unsure what config has been changed, you can run a diff of your project versus [the 7.3.x seed project] (for example, https://github.com/ChartIQ/finsemble-seed/tree/release/7.3.3)
- Delete all config files other than config.json, appd.json and manifest-local.json.
- Remove the
importConfigentries for the deleted files.
Installer and environment config
You can now run the command yarn makeInstaller to build an installer for your smart desktop. This command is compatible with the legacy config files installer.json and server-environment-start.json but we recommend migrating these configs to project.json in the root of your project.
To migrate to 8.0:
Copy your /public/configs/other/installer.json entry or entries to /project.json from the finsemble-seed repo. project.json includes a default entry called installer which can be overwritten with your entry. If your current installer.json contains multiple entries for different environments you can add them to project.json as
environments.[env].installer.Delete your /public/configs/other/installer.json file.
Delete your /public/configs/other/server-environments-startup.json file unless you've customized it. If you've customized it then move those entries to project.json as launch or
environments.[env].launch.serverPortshould be renamed asport.serverConfigshould be renamed asmanifestUrl.
Example conversion:
Here's a sample legacy server-environment-startup.json file:
{
    "development": {
        "serverPort": 3375,
        "serverConfig": "http://localhost:3375/configs/application/manifest-local.json",
        "chromiumFlags": {
           "remote-debugging-port": 9222
        },
    },
    "production": {
        "serverPort": 3375,
        "serverConfig": "http://productionsite.com/configs/application/manifest-local.json",
    }
}
and here's a sample legacy installer.json file:
{
    "icon": "./public/assets/img/installer_icon.ico",
    "version": "7.0.0", "outputDirectory": "./pkg", "name": "Finsemble",
    "authors": "Cosaic",
    "description": "Finsemble",
    "companyName": "Cosaic",
    "certificateFile": null,
    "certificatePassword": null,
    "signWithParams": null,
    "background": "./public/assets/img/installer-image-mac.png",
    "loadingGif": "./public/assets/img/installer-image-windows.gif",
    "macIcon": "./public/assets/img/installer_icon.icns"
}
Here it is, converted to project.json:
{
  "installer" : {
    "manifestUrl": "http://productionsite.com/configs/application/manifest-local.json",
    "chromiumFlags": {},
    "icon": "./public/assets/img/installer_icon.ico",
    "version": "7.0.0",
    "outputDirectory": "./pkg",
    "name": "Finsemble",
    "authors": "Cosaic",
    "description": "Finsemble",
    "companyName": "Cosaic",
    "certificateFile": null,
    "certificatePassword": null,
    "signWithParams": null,
    "background": "./public/assets/img/installer-image-mac.png",
    "loadingGif": "./public/assets/img/installer-image-windows.gif",
    "macIcon": "./public/assets/img/installer_icon.icns"
  },
  "launch": {
    "port": 3375,
    "manifestUrl": "http://localhost:3375/configs/application/manifest-local.json",
    "chromiumFlags": {
      "remote-debugging-port": 9222
    }
  },
  "environments" : {
    "production": {
      "launch" : {
        "manifestUrl": "http://productionsite.com/configs/application/manifest-local.json",
        "chromiumFlags": {}
      }
    }
  }
}
Both environments use the basic "launch" configuration. The production environment overrides the manifest location and chromium flags for launching.
Notice that you can now specify manifestUrl and chromiumFlags directly in the "installer" section. Therefore, you can now delete the /public/configs/other folder.
Building and running
Your conversion should now be complete. Run yarn dev to build the project and launch Finsemble. When deploying your files to the server, we strongly recommend that you check out additional details in A strategy for reliable upgrades and rollbacks.
Troubleshooting
If Finsemble doesn't start, first check for any Typescript or Webpack errors. If there are no errors then wait a minute to see if Finsemble's error screen pops up. If so, click the "Central Logger" button and look for errors. If you don't get the pop up, open http://localhost:9090 in Chrome. Make a note of which services are running. Click on the LoggerService if it's running and type showConsole() in the Chrome developer tools. This should bring up the Central Logger.
Double check your storage adapter configuration. This can cause startup problems. If this is the issue then you will likely see 404 errors in the developer console for the storage service (click on "Storage Service" in the Central Logger.) These errors should guide you to the problem.
Other notable changes after upgrading
Finsemble no longer uses a vendor bundle (vendor.bundle.js, created by webpack.vendor.js). Finsemble's built-in webpack process now supports tree shaking, which produces UI components that are much smaller so that vendor bundling is unnecessary.
Finsemble no longer supports parallel builds. We have reduced build times substantially so that parallel builds are no longer necessary.
theme.css is now always loaded dynamically. The UI components that now ship with Finsemble are pre-built, which means they must load your custom theme.css at runtime. You can still import css when customizing UI components from templates but import "../../../../public/assets/css/theme.css" is no longer part of the default templates.
Finsemble now supports the .lazy.css extension. This causes CSS styles to be rendered by React lazily (via a styles.use() call). Finsemble uses lazy CSS rendering in some of its React components.
All UI components now contain a single index.tsx which compiles to index.html and index.js. index.html is identical in all UI components. Inside index.tsx, all imports are now from @finsemble/finsemble-core at the root level.
For example, use this command to import directly from finsemble-core:
import { ToolbarSection } from "@finsemble/finsemble-core"The @finsemble/finsemble-ui library has been deprecated. We have moved all UI functionality into @finsemble/finsemble-core. We maintain the UI library for backward compatibility.
The config
appAsset.versionhas been deprecated as of Finsemble 8 and is no longer necessary for caching. Standard E-tag response headers are used to only download an asset if it has changed. We recommend that you remove version fields from all app assets.
Upgrading from 7.2 to 7.3
To upgrade from Finsemble 7.2 to 7.3, follow the instructions in the Basic upgrade process section earlier in this topic.
One thing to consider is title bars.
Finsemble supports 2 types of titlebars in its app windows:
injected- The React component that forms the Finsemble title bar is injected into the page and its contents are pushed down by the height of the title bar to accommodate it.browserview- A view separate from the title bar is created to contain the window's web contents.
In general, in Finsemble the default for window title bars is browserview. However, if you are upgrading from Finsemble 7.1 or 7.2, in those two versions we used the default of injected.
In addition, in Finsemble 7.0 we added a new config that allows you to set this mode system-wide (by specifying finsemble.["Window Manager"].titlebarType) or on a per-component basis (by specifying foreign.components.["Window Manager"].titlebarType).
The safest way to mitigate these necessary default values changes is to set the appropriate titlebarType configurations. This way your Finsemble will continue to work normally. If you have been using the default values for your window title bars and you want to ensure you keep the same values, we recommend that you compare the default value of version you are currently on with the default value you are upgrading to, and update the config of your components or system-wide config accordingly.
If you configured the windowTitleBarUrl for a component when browserview was the default (such as "windowTitleBarUrl": "$applicationRoot/components/customWindowTitleBar/customWindowTitleBar.html" ) and then you upgraded to a version with injected, the component won't have a title bar. To remedy this, you need to specifically configure that component to have foreign.components.["Window Manager"].titlebarType = "browserview"
Upgrading from 7.1 to 7.2
To upgrade from Finsemble 7.1 to 7.2, follow the instructions in the Basic upgrade process section earlier in this topic.
Update your manifest to the latest Assimilation file. Finsemble Assimilation has been updated to Assimilation version 7.2.0.
Upgrading from 7.0 to 7.1
To upgrade from Finsemble 7.0 to 7.1, open package.json and change the version number of Finsemble packages from "7.0.0" to "7.1.0". Then run yarn install and yarn build .
There are some small changes in these files and we recommend that you merge them:
- gulpfile.js
- public/configs/application/UIComponents.json
- webpack/webpack.components.js
- webpack/defaultWebpackConfig.js
- the affected CSS files
Upgrading from 6.6 to 7.0
If you are running a version earlier than 6.6 and want to upgrade to 7.0, we recommend that you upgrade to each version in turn, rather than skipping a version.
To upgrade from Finsemble 6.6 to 7.0, you need to upgrade the version of all @finsemble packages in your package.json to 7.0.0. You will also need to merge these files:
- https://github.com/ChartIQ/finsemble-seed/blob/master/src/components/toolbar/src/Toolbar.tsx
- https://github.com/ChartIQ/finsemble-seed/blob/master/src/preloads/zoom.js
- https://github.com/ChartIQ/finsemble-seed/blob/master/src/components/windowTitleBar/WindowTitleBar.tsx
- https://github.com/ChartIQ/finsemble-mono/blob/main/packages/seed/public/configs/application/UIComponents.json
Moving from custom services to app services
If you don’t use custom services, skip this step. Otherwise, we recommend that you migrate your custom services to the new app services.
App services have several advantages over custom services:
- Less boilerplate code needed to initialize a service
- Finsemble API is injected and initialized by default
- Easier to write
- Access to FDC3 API
- Same features and capabilities as any normal app.
For example, app services will have access to the SelectConnect feature. SelectConnect allows you to control the information flow and which app, component and other services can communicate with your app service.
Code changes
The main difference between app services and custom services is that custom services required you to import and initialize API clients that you needed to use. App services already import and initialize Finsemble API clients for you so migration involves simplifying your code.
If you previously imported all Finsemble API clients and initialized the ones you used, it might look similar to this:
const Finsemble = require("@finsemble/finsemble-core");

Finsemble.Clients.Logger.start();
Finsemble.Clients.Logger.log("customService Service starting up");

// Add and initialize any other clients you need to use (services are initialized by the system, clients are not):
Finsemble.Clients.LauncherClient.initialize();
You can remove this code and replace all references to Finsemble.Clients.<Client> with FSBL.Clients.<Client> as you would use in a normal app or component.
If you imported and used single clients, for example:
const Finsemble = require("@finsemble/finsemble-core");
const { Logger, WorkspaceClient } = Finsemble.Clients;
Logger.start();
WorkspaceClient.initialize();
you can again remove this code and instead set up a reference to the copy of the client injected for you:
const Logger = FSBL.Clients.Logger;
const WorkspaceClient = FSBL.Clients.WorkspaceClient;
or simply replace the references to those clients.
Finally, there is no need to extend the Finsemble BaseService, declare startupDependencies or implement a handler for onBaseServiceReady and any such code can be removed. If you do need to implement dependencies on your other app services (rather than Finsemble services), see the App services for instructions.
Configuration changes
To migrate your existing services configuration to an appD record, let's assume you have this service configuration in your services.json file:
"myCustomAppService": {
    "bootParams": {
        "stage": "preuser",
            "dependencies": []
    },
    "name": "myCustomAppService",
    "html": "$applicationRoot/services/myCustomAppService/MyCustomAppService.html"
}
This translates to this appD record:
"myCustomAppService": {
    "appId": "myCustomAppService",
    "name": "myCustomAppService",
    "manifest": {
        "bootParams": {
            "stage": "preuser",
            "stopOnFailure": true,
            "autoStart": true
        },
        "appService": true,
        "waitForInitialization": true,
        "window": {
            "url": "$applicationRoot/services/myCustomAppService/MyCustomAppService.html"
        }
    }
}
Process management
If you don’t customize process management settings in your smart desktop, you don’t need to do anything here. In Electron 14, the app.allowRendererProcessReuse flag and affinity argument to BrowserWindow were removed as part of work to align Electron with Chromium's process models (see the Electron changelog for details) and, as a result, to improve the security and maintainability of Electron.
The Finsemble team has implemented a replacement for process affinity that achieves virtually the same effect as affinity in Electron, but remains within the bounds of Chromium process models and site isolation security measures. Hence, Finsemble supports the same config that it currently does for controlling affinity, with a few minor changes:
- We've deprecated the
manifest.window.windowType: "application"setting, which is currently used to disable affinity. To achieve the same effect in Finsemble 7.0, setmanifest.window.affinity: false. - We've added a new setting to control the default affinity applied to apps:
finsemble.servicesConfig.launcher.defaultComponentAffinity: "affinityName". Setting this value to false disables using affinity by default. You can override this behavior for an individual app by settingmanifest.window.affinityin its appD configuration.
The one other difference is that previously you could use process affinity to combine render threads for apps served from different sites. (For the purposes of site isolation, a site is defined by a domain name and protocol, Port numbers and sub-domains are ignored. For more information about site isolation see Chomium's security documentation.) Combining render threads from different sites is no longer possible for security reasons.
Hence, as a developer working in Finsemble you shouldn't need to make any major changes to your app configurations or implementations to use the new process affinity implementation. We still recommend a quick scan to replace the deprecated config we’ve just looked at. However, you might also be able to achieve a lower overall memory footprint by combining the finsemble UI with the affinities used by business apps. See Process management for more detail.
Configuring title bar
Finsemble includes two different ways of providing a title bar to web apps: a browserview title bar (where an Electron browserview is added to the window with a separate DOM) and an injected title bar (where the title bar is injected into the same DOM as your app, without a separate browserview). To improve process management and to reduce the memory footprint of your desktop, we've switched the default title bar type from browserview to injected. Improved accessibility is an additional benefit of using injected title bars.
Because of a limitation in the Electron Browserview APIs, windows with browerview title bars can't be combined with apps into the same render thread. Hence, injected title bars have a lower memory footprint and provide better support for process management than browserview ones do.
If you don’t want the new default setting you can restore the previous behavior. You can override the default title bar type for all applications by setting finsemble.Window Manager.titlebarType = "browserview" or for an individual app by setting manifest.foreign.components.Window Manager.titlebarType = "browserview" in its appD configuration.
On some rare occasions you might run into a) display issue caused by an injected title bar. If this happens, either switch the component to a browserview title bar or explore the options available for adjusting your page's CSS automatically via the manifest.foreign.components.Window Manager.FSBLHeader configuration settings (see adjustContentHeights and bumpElements).
Upgrading from 6.5 to 6.6
To upgrade from Finsemble 6.5 to 6.6, in the Seed's package.json, change the 4 entries beginning with @finsemble to reference the new version, "6.6.0".
Because we updated Assimilation with this particular release, you need to merge in the changes from the 6.6.0 release's manifest-local.json into your own config. Open the manifest-local.json config and locate the config for Assimilation underneath the "appAssets" header. Update the "src" and "version" fields appropriately:
"src": "https://assets.finsemble.com/releases/6.6.0/assimilation/assimilation.zip""version": "6.6.0.0"Notice an extra zero at the end. That's intentional because that’s how Assimilation versioning works.
Upgrading from 6.4 to 6.5
To upgrade from Finsemble 6.4 to 6.5, you need to upgrade the package.json and rebuild. If you are running a version earlier than 6.4 and want to upgrade to 6.5, we recommend that you upgrade to each version in turn, rather than skipping a version.
Upgrading from 6.3 to 6.4
At the minimum, you need to upgrade the package.json dependency versions and rebuild your Finsemble.
In addition, there are optional changes you should consider. We modified some JavaScript files and converted them to TypeScript. As a result, you might optionally want to merge these files into your project:
- localStorageAdapter.ts, formerly localStorageAdapter.js
- indexedDBAdapter.ts, formerly indexedDBAdapter.js
- webpack.adapters.entries.json, now modified to reflect that these two file were renamed
Don't do a piecemeal merge. Either merge all these files, or none at all.
For all of the project-side changes between 6.3 and 6.4, see https://github.com/ChartIQ/finsemble-seed/compare/release/6.3.0...release/6.4.0-beta.2)
Issues you might run into
We’ve deprecated the ShareButton as deprecated in the WindowTitlebar. As a result you could see a log message like this one in your Central Logger:
The ShareButton component is deprecated. It will be removed in a future Finsemble version.
To get rid of this message, remove ShareButton from WindowTitleBar.tsx.
WindowTitleBar.tsx has changed. You don’t need to merge this change into your seed yet, but this functionality has been deprecated and will be removed in the future. We recommend you start planning for the removal ahead of time.
Upgrading from 6.2 to 6.3
Upgrading from 6.2 to 6.3 involves merging in the changes from the new package.json that we include in the release into your own package.json. You will also need to copy the changes from the Seed's webpack directory into the webpack directory for your own project, in order to take advantage of the vendor bundling size optimizations included with this release.
Upgrading from 6.1 to 6.2
Upgrading from 6.1 to 6.2 involves merging in the changes from the new package.json that we include in the release into your own package.json.
There are no breaking changes in this release. However, there are some dependencies that will give you a warning in your build output if you don’t upgrade them. None of these are critical, but because there are several of them, you will see quite a few of these warnings. Seeing these warnings every time you build can be confusing and irritating. For this reason, we strongly recommend that you upgrade these dependencies at this time.
For your information, here is the complete list of dependency version changes from package.json as part of this release:
Optional dependencies
- @finsemble/finsemble-cli: 6.1.3 --> 6.2.0
Dependencies
- @finsemble/finsemble-core: 6.1.3 --> 6.2.0
- @finsemble/finsemble-electron-adapter: 6.1.3 --> 6.2.0
- @finsemble/finsemble-ui: 6.1.3 --> 6.2.0
- async: 3.2.0 --> 3.2.1
Dev dependencies
- @babel/core: 7.14.6 --> 7.15.0
- @babel/plugin-transform-modules-commonjs: 7.14.5 --> 7.15.0
- @babel/plugin-transform-runtime: 7.14.5 --> 7.15.0
- @babel/preset-env: 7.14.7 --> 7.15.0
- @babel/runtime: 7.14.8 --> 7.15.3
- chalk: 4.1.1 --> 4.1.2
- react-syntax-highlighter: 15.4.3 --> 15.4.4
- ts-loader: 9.2.3 --> 9.2.5
- webpack: 5.45.1 --> 5.51.1
- webpack-cli: 4.7.2 --> 4.8.0
You can also compare branches.
Upgrading from 6.0 to 6.1
To upgrade from 6.0 to 6.1 you need to make sure you have node.js v14.17.4.
We support the latest LTS version of node.js. If you use the later version, Finsemble might not work.
Finsemble's seed project has been upgraded to use Webpack 5 and Typescript 4. Because of these upgrades and because some of the features were renamed, we’ve made some changes in the Seed repo. The seed's webpack directory, package.json, and tsconfig.json files have been updated, and these changes need to be merged when upgrading.In this release, @finsemble/ui's new <FinsembleIcon> component depends on an additional Webpack Loader for SVG files (@svgr/webpack), which is pre-configured in the default Webpack configuration rules (defaultWebpackConfig.js).
We recommend that you merge in the latest seed changes into your own desktop project when you upgrade. For a full list of necessary changes, see the 6.0.0 to 6.1.0 comparison on GitHub.
If you are on v6.0, we recommend that you check out the new v6.1 release branch and merge it into your current v6.0 branch. Depending on the level of customizations you’ve made, you might encounter some conflicts (mainly in the package.json and JSON config files) which need to be resolved. All other v6.1 changes should be automatically merged (if you have made build customizations you will also get some conflicts that need to be dealt with on the webpack folder).
Upgrading from 5.4 to 6.0
Finsemble 6.0 requires Node.js version 12 and yarn. If you run into permission issues, check out the advice in Installing.
Merge from finsemble-seed/. When merging Finsemble 6.0 from a remote origin into a new branch of your project, the merge will show conflicts that you need to resolve. These conflicts include:
Name changes related to the addition of the public directory
- /dist moved to /public/build
- /config and /assets moved into the /public directory
- The json and img files previously located in /configs and img files located in /assets have moved into /public
/build/webpack moved to /webpack
- gulp-extensions was importing ./build/webpack, changed to ./webpack
Updates to .gitIgnore
- Updates to .md files
- Changes to the GulpFile because of changes to paths and the new folder structure
- Updates to the package.json file
- package.json had over 40 conflicts due to changing from spaces to tabs.
- We added several packages and many packages had their version updated.
- Config changes
- You might need to manually merge config in manifest-local.json and components.json
- Finsemble 6.0 automatically calculates the values of the config macro variable (e.g.
$applicationRoot,$moduleRoot). So, you don’t need to set these in your manifest file if you switch to the new Finsemble directory structure. If you need to customize the macros, see [Using manifest macros][./deployingYourSmartDesktop.md#Using manifest macros to optimize complex deployments] - Config files are no longer stored under
$applicationRoot. Use the$configRootvariable for specifying paths to config files instead.
Depending on your customizations, you might find other conflicts that you need to resolve.
Manual upgrade From 5.4 to 6.0
Use this strategy if you haven't forked from the seed or are running into difficulty using the merge steps.
Clone the latest 6.0 seed into a new directory. It will be easier to move files into the new seed than the other way around.
Copy build/webpack/webpack.component.entries.json from the old project to the webpack directory in the new project.
Because of the new folder structure in 6.0, gulpfile.js has changed. An example is the constant
configPath. It now references the new webpack directory. If you made any custom changes, you need to port them to the new file.If there is a gulpfile-extensions.json file, copy those to the root directory of the new project.
Reapply any changes made to the original package.json to the new package.json. Use a diff tool such as windiff or meld to identify these changes.
We eliminated the server folder. If you were using the Seed project's built-in server, you will need to use a gulpfile-extensions.js file to replace the existing
startServergulp task. Copy that task into /gulpfileextensions.js and customize it.noteThe app that is returned from
FEA.Server.start()is an express server that can be amended as needed.Copy the contents of your /assets folder from the old project to the /public/assets directory in the new project.
The config folder has moved to the /public/configs.
- In earlier versions of Finsemble (before 6.0), the
$applicationRootconfig macro gave the URL to the root of your Finsemble deployment. Finsemble 6.0 revises the deployed directory structure and separates static assets (such as images, config files etc.) from built files.- A new macro represents the root of your deployment,
$documentRoot. $applicationRootpoints to built files and defaults to$documentRoot/build.- The config folder is no longer located under
$applicationRoot. A new config macro,$configRoot, provides the path to the config folder and defaults to$documentRoot/configs.
- A new macro represents the root of your deployment,
- Config macros (such as
$applicationRoot,$moduleRoot, and$configRoot) are calculated automatically from the manifest file path and don’t need to be specified in your manifest. This calculation assumes you’re using the default folder structure for Finsemble 6.0.- If you need to override the default macros, see [Using manifest macros][/docs/manage/deployingYourSmartDesktop#using-manifest-macros-to-optimize-complex-deployments].
- If you need to create your own custom macros you can do so by adding them to the
finsemble.customsection of your manifest.
- Reapply changes that you made to the default config files.
- Use a diff tool such as windiff or meld to simplify this task.
- We modified manifest-local.json and removed the config macros. Finsemble now calculates them automatically.
- Before running a diff on config.json, replace spaces with tabs.
- In VSCode press Crtl+P and then pick Convert Indentation to Tabs from the dropdown menu.
- When reapplying changes, verify the frequently changed configurations:
- Tabbing and tiling config
- Logger config
- importConfig. You might need to change the macro
$applicationRootto$configRoot. For example, $applicationRoot/configs/application/components.json is now $configRoot/application/
- UIComponents.json - 6.0 adds the FDC3 Resolver
- In earlier versions of Finsemble (before 6.0), the
We modified the contents of the /src directory, mostly adjusting links and imports for the new location of css and assets. If you’ve customized Finsemble’s built-in UI components, you need to copy your src files into this directory and reapply any changes you've made. The most important files are:
- /src/toolbar/src/Toolbar.tsx,
- /src/toolbar/src/FileMenu.tsx, and
- /src/windowTitleBar/WindowTitleBar.tsx
When you’re done, build with yarn dev. You can also copy the content back to your original project and check it into your revision control.
Moving from Linker to Interop (FDC3)
Although the Linker Service and Interop Service provide similar functionality, there isn't a 1 to 1 correlation between APIs. Some use cases, such as publishing data from 1-to-many apps, are straightforward. You can replace publish() with broadcast(). In other cases, like getLinkedWindows(), this functionality is no longer supported.
When you transition from Linker APIs to Interop APIs, remember that not only have the functions and signatures changed, but so has the structure of the data being passed.
Take this example of an object being passed to FSBL.Clients.LinkerClient.publish(). It’s a simple object with dataType and data properties. Any app on the same channel listening for a topic “symbol” receives the update.
FSBL.Clients.LinkerClient.publish({
    dataType: "symbol",
    data: "AAPL",
});
The same can be achieved using the Interop Service’s broadcast function with an FDC3 context object.
fdc3.broadcast({
    type: "symbol",
    symbol: "AAPL",
});
Context objects can contain any fields. The only requirement is that they contain a field called type which other apps listening on the same channel can use. To learn more about FDC3 context objects and the FDC3 standard, see the spec.
Linker APIs vs Interop APIs
Here is a basic reference of Linker APIs, and possible replacements within the Interop Service.
| Replace the Linker Client APIs | With this Interop Client |
|---|---|
subscribe | addContextListener |
publish | broadcast |
addIntentListener | |
getAllChannels | getSystemChannels |
getOrCreateChannel | |
getLinkedComponents | N/A |
getLinkedWindows | N/A |
getState | getCurrentChannel |
linkToChannel | joinChannel |
onStateChange | N/A |
openLinkerWindow | N/A |
removeEventListener | N/A |
unsubscribe | addContextListener.unsubscribe |
unLinkFromChannel | leaveCurrentChannel |
Notes
- If you’re using the FDC3 extension in the existing implementation, removing the extension should be as simple as deleting the preload from component config, then removing the custom service and client from the project.
- To use your own fdc3, you need to override
window.fdc3(which Finsemble injects). You could do this in code or with a preload. - Apps that use the Linker Service don’t interoperate with apps that use the Interop Service. We recommend that you migrate apps based upon common interop needs.
- Linker channel names, colors, and the number of channels are no longer customizable.
- There is no longer a way for a window to identify the other windows to which it is linked. The reason is that this is not currently supported in the FDC3 standard. Rather than extending the standard, we made a product decision to stick to the standard to steer developers away from low level (that is imperative) coding.
More about Interop documentation.
Upgrading from components.json to appd.json
The appd.json file, located at ..\public\configs\application\appd.json, follows FDC3’s AppD schema.
Specifically, here are the changes:
The /public/config/application/appd.json file is new to the Seed Project’s configs and sets this config entry point.
You can port apps configured in components.json to the appd.json using a new CLI command:
npx finsemble-cli migrateYou can also add new apps to appd.json using the new CLI command:
npx finsemble-cli add app <appname>Finsemble 6.0 supports all Finsemble config if you specified them in the manifest property of an app definition within the appd.json file.
FSBL.Clients.ConfigClient.processAndSet()still functions as expected and you can use it to add applications to Finsemble's appd configuration.The launcher subsystem gives the apps loaded from the appd.json file two additional fields. These are temporary helpers to drive transitionary logic.
appDConfigcontains the original AppD configurationisAnAppis set to true.
For more info about configuration, see Configuration reference
A component defined in components.json
Consider this example component definition from an earlier version of Finsemble.
"components": {
    "Welcome Component": {
      "window": {...},
      "component": {
        "displayName": "Welcome Component",
        "spawnOnStartup": false,
        "preload": "$applicationRoot/preloads/zoom.js"
      },
      "foreign": {
        "services": {...},
        "components": {...}
        }
      }
    }}
An app defined in appd.json
Notice the configuration starting with the manifest. Finsemble configuration from components.json is now nested under the manifest property in the app definition.
"appd": {
    "Welcome Component": {
      "appId": "Finsemble Welcome Component",
      "name": "Finsemble Welcome Component",
      "description": "Have a friendly welcome when you start your Finsemble experience.",
      "manifest": {
        "window": {...},
        "component": {...},
        "foreign": {
          "services": {...},
          "components": {...}
        },
        "interop": {}
      },
      "version": "1.0.0",
      "tooltip": "Welcome to Finsemble",
      "images": [],
      "contactEmail": "info@cosaic.io",
      "supportEmail": "support@finsemble.com",
      "publisher": "Cosaic",
      "icons": [],
      "intents": []
    }
Migrating using the CLI
A migration script moves apps from components.json to appd.json (and changes the format to AppD).
npx finsemble-cli migrate
This script overwrites appd.json. It is meant to be used one time only.
Notes:
- Make sure you are using the Finsemble 6.0 version of the CLI.
- Only visible apps (that is, components with
foreign.components.App Launcher.launchableByUserset totrue) get migrated from components.json to appd.json. Hidden apps will not be migrated.
Dynamic configuration
Per the Dynamic Configuration tutorial, you need to make a few changes to enable the same functionality with apps in appd.json. Instead of accessing components from finsemble.components, apps in appd.json are accessed from finsemble.appd.
This example shows a listener and handler written to respond to changes to component.type.
Before
function configChanged(err, newConfig) {
    // Do what you need to do here with newConfig
}

// Get component type of current component
var componentType = FSBL.Clients.WindowClient.options.customData.component.type;

// Add listener
FSBL.Clients.ConfigClient.addListener({ field: "finsemble.components." + componentType }, configChanged);
After
After you configure apps in appd.json, rewrite the listener to respond to changes in app.name. Note that component.type and app name property share the same purpose. Also, appD config is accessed via the appDConfig property from the WindowClient.
function configChanged(err, newConfig) {
    // Do what you need to do here with newConfig
}

// Get component type of current component
let appName = FSBL.Clients.WindowClient.options.customData.appDConfig.name;

// Add listener
FSBL.Clients.ConfigClient.addListener({ field: "finsemble.appd." + appName }, configChanged);
Dynamic configuration in the toolbar
Instead of a component property and setter, access apps from an apps property and setter after getting the finsemble config from the ConfigClient.
const [apps, setApps] = useState([] as any[]);
useEffect(() => {
        FSBL.Clients.ConfigClient.getValue("finsemble", (err: any, config: any) => {
            const menuConfig = config.menus;
            const apps = config.appd;
            if (Array.isArray(menuConfig)) {
                setDynamicMenus(
                    menuConfig.filter((menu) => menu.menuType === "App Launcher" || menu.menuType === "Advanced App Launcher"),
                );
                setApps(
                    apps
                );
            }
        });
    }, []);
.NET changes
The introduction of .NET Core 5 support introduces several changes to the structure of Finsemble DLL. You need to add multiple dlls based on your choice of UI Framework in .NET. Most of the Finsemble API is available via Finsemble.Core.DLL and anything UI specific is available via Finsemble.WPF.DLL and ``Finsemble.Winforms.DLL.
Continuing to use Quick Components
If you want to continue using the Quick Component in the App Launcher (not to be confused with the Advanced App Launcher), we suggest these steps:
- Copy a previous version of the
appLaunchercomponent from the 5.x finsemble-ui package npm package. - Rename it and move the renamed version to the location where you keep client UI components.
- Replace
<AppLauncherMenu />with<RenamedAppLauncherMenu enableQuickComponents={true} />in Toolbar.tsx. - Copy the
quickComponentFormcomponent from the 5.x or 6.0 finsemble-ui npm package. - Rename it and move the renamed version into the location where you keep client UI components.
- Update packages\seed\src\components\quickComponentForm\QuickComponentForm.tsx to reference the renamed quick component form.
This assumes that the quick component form already exists in the seed, and is referenced in the UIComponents.json config. If you don’t have one, copy it from the previous version of Finsemble.
Deploying your upgrade
After you complete your update, you need to deploy it to your users. Here are the steps:
To expedite the update, set
finsemble.waitForUpdate: truewithin your 5.x manifest-local.json config. This will force Finsemble to retrieve and install any available updates for the container, Finsemble Electron Adapter, before starting up. If not set, Finsemble will start up normally on your existing version, download updates in the background and prompt the user to restart to apply the update when it is ready.Build and deploy 6.0 assets, including the manifest, to a new host URL. Don’t use the old location for this step. You need to deploy to a new location because, during the update, you need both versions to coexist. You need the old version to be able to load on the old directory structure so that it can run and update the user to 6.0. The two versions can coexist on the same server, but need to be on separate paths.
Set the serverConfig URL in the public/configs/other/server-environment-startup.json file in your 6.x version to the location of the new manifest file. You can use the same updateUrl as configured for your 5.x version or set a new one, to be used for future updates, at your discretion.
Build your 6.0 installer, as explained in Deploying your smart desktop. This process creates several new files:
- Installer .exe file
- Delta .nupkg file (created if you retained your previous installer files)
- Full .nupkg file
- RELEASES
You must deploy all of the files created for the Electron upgrade to work. The Delta files contain only the difference between the previous and current installer files and allow for a smaller update download.
The RELEASES file contains info about the available updates. Finsemble retrieves it first to determine if there is an update that needs to be applied.
Copy the full, delta (if created) .nupkg files, and RELEASES files to the location that is referenced by your updateUrl, configured in your configs/other/server-environment-startup.json file in your 5.x version. You can also deploy the installer .exe file to the same location, or another URL, for new users to download. The next time your users launch Finsemble, they will be automatically upgraded to the new version.
noteYou must specify updateUrl when building the installers for both 5.x and 6.x to enable updates. See Deploying your smart desktop for details.
You have deployed your 6.0 assets to a new URL. This results in you having deployments of both 5.x and 6.0 Running an upgraded 6.0 executable that is targeting a 5.x environment doesn’t work. Neither will an old 5.x executable run on an upgraded 6.0 environment.
You can remove the old version after all the users have upgraded to 6.x.
Alternative deployment procedure
If you haven’t configured auto-update or used a deployment system to install Finsemble for your users, you can run the full installer .exe file to overwrite a 5.x installation with a 6.0 version. To do so, follow steps 1-4 above to create a 6.0 deployment and build an installer for it. You can then either distribute the installer .exe file for your users to run, or you can apply it for them.
Finsemble is normally started automatically after installation. To instead execute a silent install of Finsemble use the command line and add the --silent flag after the path to the installer .exe file:
$ finsemble.exe --silent
For more information about deployment, see Deploying your smart desktop.
Upgrading from 5.x to 5.4
The upgrade process includes:
- Packages
- Assimilation, unless you disabled it
- Seed
Let’s look at each in turn.
Upgrading packages
Most of Finsemble's updates consist of packages you add to your own Finsemble build. Update your Finsemble packages in the packages.json. The specific packages you need to update depend on the update. Finsemble includes these packages:
- @finsemble/finsemble-core,
- @finsemble/finsemble-electron-adapter
- @finsemble/finsemble-ui
- @finsemble/finsemble-cli
Major and. minor releases usually update all of these packages, but patches might update one or more of these.
You also need to update your version number. Here is what you need to:
- Find the packages.json file and open it.
- Find the lines where the old version number is stored. For example, you might see something like this:
"license": "SEE LICENSE IN LICENSE",
   "optionalDependencies": {
      "@finsemble/finsemble-cli": "5.3.*"
   },
   "dependencies": {
   "@finsemble/finsemble-core": "5.3.*",
   "@finsemble/finsemble-electron-adapter": "5.3.*",
   "@finsemble/finsemble-ui": "5.3.*",
   "async": "3.2.0",
   "compression": "1.7.3",
   "express": "4.16.4",
- Replace the old version number with the new one. Your screen should look similar to this:
"license": "SEE LICENSE IN LICENSE",
   "optionalDependencies": {
      "@finsemble/finsemble-cli": "5.4.*"
   },
   "dependencies": {
      "@finsemble/finsemble-core": "5.4.*",
      "@finsemble/finsemble-electron-adapter": "5.4.*",
      "@finsemble/finsemble-ui": "5.4.*",
      "async": "3.2.0",
      "compression": "1.7.3",
      "express": "4.16.4",
      ...
Notice that in our example the version changed from 5.3 to 5.4 in multiple places.
- Run
yarn installornpm installto bring in the new packages.
Upgrading assimilation
If you have assimilation enabled, you want to incorporate updates to it into your upgrade. The assimilation version is updated at runtime. To upgrade assimilation, find the latest version on https://github.com/ChartIQ/finsemble-seed/releases and download the .zip file. On your local machine, open the file configs/application/manifest-local.json. In the appAssets object, find the assimilation version for your release.
Replace the Assimilation object in your own config with the one in the repo. For example, the config would change from this:
"appAssets": [
               {
                  "src": "https://assets.finsemble.com/assimilation/assimilation_5.0.1.0.zip",
                  "version": "5.0.1.0",
                  "alias": "assimilation",
                  "target": "AssimilationMain.exe"
                }
             ],
to this:
"appAssets": [
               {
                  "src": "https://assets.finsemble.com/assimilation/assimilation_5.1.0.0.zip",
                  "alias": "assimilation",
                  "target": "AssimilationMain.exe"
               }
             ],
appAsset.version has been deprecated as of Finsemble 8 and is no longer functional. Standard E-tag headers are used to only download an asset if it has changed.
Version 5.2.0 doesn’t have an upgrade from version 5.1.0. There is work underway to incorporate assimilation into one of the packages in the section above.
Updating seed
If there are changes to the seed, we publish them to the seed repository. See https://github.com/ChartIQ/finsemble-seed/releases for details.
We usually provide seed releases when we introduce new UI components, a new version of assimilation, a new configuration, or in some cases bug fixes or improvements to the build.
Depending on the level of changes to your project and the changes in the seed, you may be able to merge in the seed branch with minimal changes. Ideally, you should keep seed changes to a minimum. This way, any changes to the seed won’t affect your customizations.
To see the new features available, we recommend that you diff your current version against the version you want to upgrade to. You can do this on GitHub:
- Pick the release branch that you want: (Release branches are always prefixed with "release/")
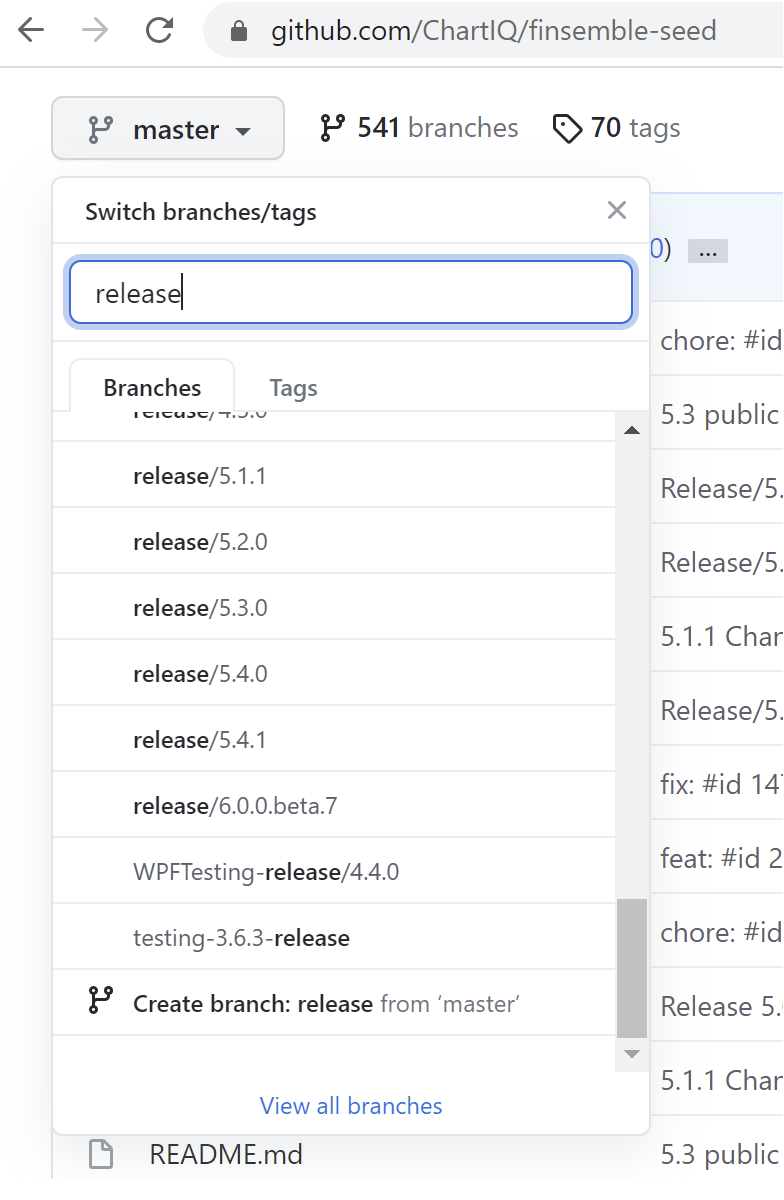
- Click Compare
- Pick your current release version:
- Now you can see the changes for the release. Apply all the changes.
Upgrading the seed from 5.0 to 5.x
Skip this section if you started from anything other than 5.0.0.
The 5.0.0 seed has different naming conventions and its commit history is separate from the rest of the releases. Therefore, for updating the seed from version 5.0.0 on branch release-5.0.0 you must use a merge assist branch.
The 5.0 release doesn’t follow the release/ prefix convention.
There are currently the 5.0.0-5.1.1-merge-assist and 5.0.0-5.2.0-merge-assist branches. To update from 5.0.0, follow the same procedure outlined in the previous section for updating the seed, but use these merge assist branches. Most of the changes will be white space changes. After you complete this process once, you won’t need any further merge assist branches.
Upgrading from 4.x
If you’re running a very early version of Finsemble, we don’t recommend that you upgrade it by yourself. Contact support@finsemble.com and we’ll be happy to help.