Deploying an SDD project
When you are satisfied with your project, it’s time to deploy it. There are 2 ways to deploy your project: Cosaic cloud or local. Each way has its advantages and disadvantages, depending on your use case.
Cloud publishing
Publishing to the Cosaic cloud is the easier of the two methods. Finsemble does everything for you—all you need to do is click a button. Sharing the installer is as easy as sharing a link. Because cloud publishing is so straightforward, we recommend that you use this method for simple deployments if you can. We follow the standard industry practices to keep your project secure.
When you publish to the cloud, your executable and all the assets reside on the cloud.
During a proof of concept (POC), our engineers likely publish their projects to the Cosaic cloud.
Limitations of cloud publishing
As we have just seen, publishing to the cloud is easy and convenient. However, cloud publishing has some limitations.
Company policy. The most frequently occurring limitation is your own policies. If your IT department requires that you deploy all the software on premises, you can’t deploy to the cloud unless they make an exception for you. In most companies, such an exception is unlikely.
Access through a URL. Deployment to the cloud means that your executable and all your assets are behind a randomly generated URL. This means that anyone that has this URL can access what you publish. If this makes you uneasy, publish locally.
Internet access required to start Finsemble. When you publish to a cloud, your customers will need internet access to start Finsemble.
Making changes is hard. If you deploy Finsemble and then you want to make changes to the assets and the executable, you must do so from the original installation that created the deployment.
Limited customization. You can deploy to the cloud any customizations that you can access via SDD. For many changes that require the SDK, cloud deployment might still be possible, but we haven’t tested such a deployment. Use at your own risk.
Signing. You can’t sign your installer.
To publish to the cloud
In the Smart Desktop Designer, navigate to the Dashboard page. Open your current project.
Click “Publish”.
The SDD displays a URL where you can get a link to the installer. Collect this link. The cloud takes about 10 to 15 minutes to generate the installer.
Local deployment
Most Finsemble customers deploy locally. The primary reason for this is the IT department policy.
There are 2 important advantages of deploying locally. First, you have full control over where you host Finsemble. You must have access to a web server to host your deployment, but if your firm already deploys products locally, this is not usually a problem.
The other advantage is that you have full access to all features available in the SDK, which is not possible with SDD.
To publish locally
Open the Smart Desktop Designer and navigate to the Dashboard page. Open your current project. Make sure your project has a name, such as “My Project”.
noteWhen you create a new project, Finsemble names it “default”. Change this name to something that is meaningful to you.
Click “Select folder” and choose a location for your project folder. If you intend to collaborate on the project with other people, you need to save it somewhere where they can access it. You can save the project to a OneDrive folder or on a file server. Or, simply save it to your Documents folder. If you open the folder you just selected, the contents should look similar to this:

Depending on your folder settings, you might not see the .gitignore file.
Open a bash or command prompt and navigate to move the directory of that new project folder. Run
yarn installornpm install. Now your folder looks like this:
If you used npm, you’ll have a package-lock.json file instead of a yarn.lock file.
If necessary, move the
publicfolder to the server you want to deploy from. Make sure that that location is accessible using the http protocol, such as on a web server.Open the package.json file, and change the URL locations to the server you moved your
publicfolder to.tipIf you are testing this process but don’t have access to a web server, change the URL to “localhost:3375”.
Run
yarn makeInstallerornpm run makeInstaller. Now your folder looks like this:
And your “installer” folder should look like this:

Instead of “My Project”, you’ll see your project name.
::: note
When running the makeInstaller script with arguments using npm, be sure to include --
(for example `npm run makeInstaller -- --environment production`).
:::
- If you changed your manifestUrl to
localhost:3375, runyarn finsemble serverornpm run finsemble serverat this time.
Run installer/My Project.exe to launch your smart desktop.
If something goes wrong
Occasionally you will run into a problem while following the steps to publish your project. You might see an error message like this:
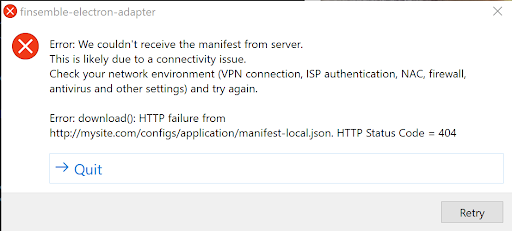
Although the message talks about connectivity issues, the most likely cause is that you pointed your manifest to a wrong link. You need to edit your package.json file. Its manifest is pointing to a non-existent link. Go back to step #4 and verify that the location is accessible.
If you get this error:
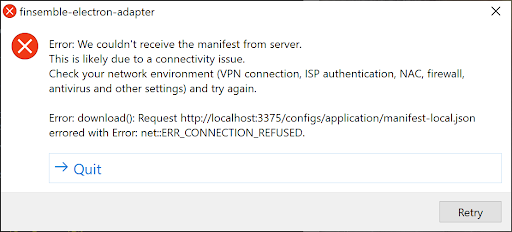 You pointed your package.json at a local server, but you didn’t start your local server. Quit out of that dialog, go to your project folder, and run
 yarn finsemble server. When you see the message “Listening on port 3375”, you can try to run your .exe again.