Deploying your smart desktop
Deploying your smart desktop (getting it to your end users) involves three steps:
- Host the public directory of your project on a web server. Your smart desktop loads these assets when it launches.
- Host your apps (the individual windows that make up your smart desktop). Apps may be web or native. Web apps must be hosted by a web server. Native apps must be installed independently on user desktops or hosted as an "appAsset" (a zip file containing the native executable that your smart desktop downloads and runs at launch time).
If your apps are in your project's public directory then there is no need for step 2.
- Create and deliver an installer to your end users' computers. Your installer installs your smart desktop's "runtime" (an executable). It then creates a desktop icon and Start menu entry to launch your smart desktop.
This topic provides these steps for (1) initial deployment and (2) upgrades.
If you have built your desktop using SDD, there is an easier process. Check out Deploying an SDD project instead.
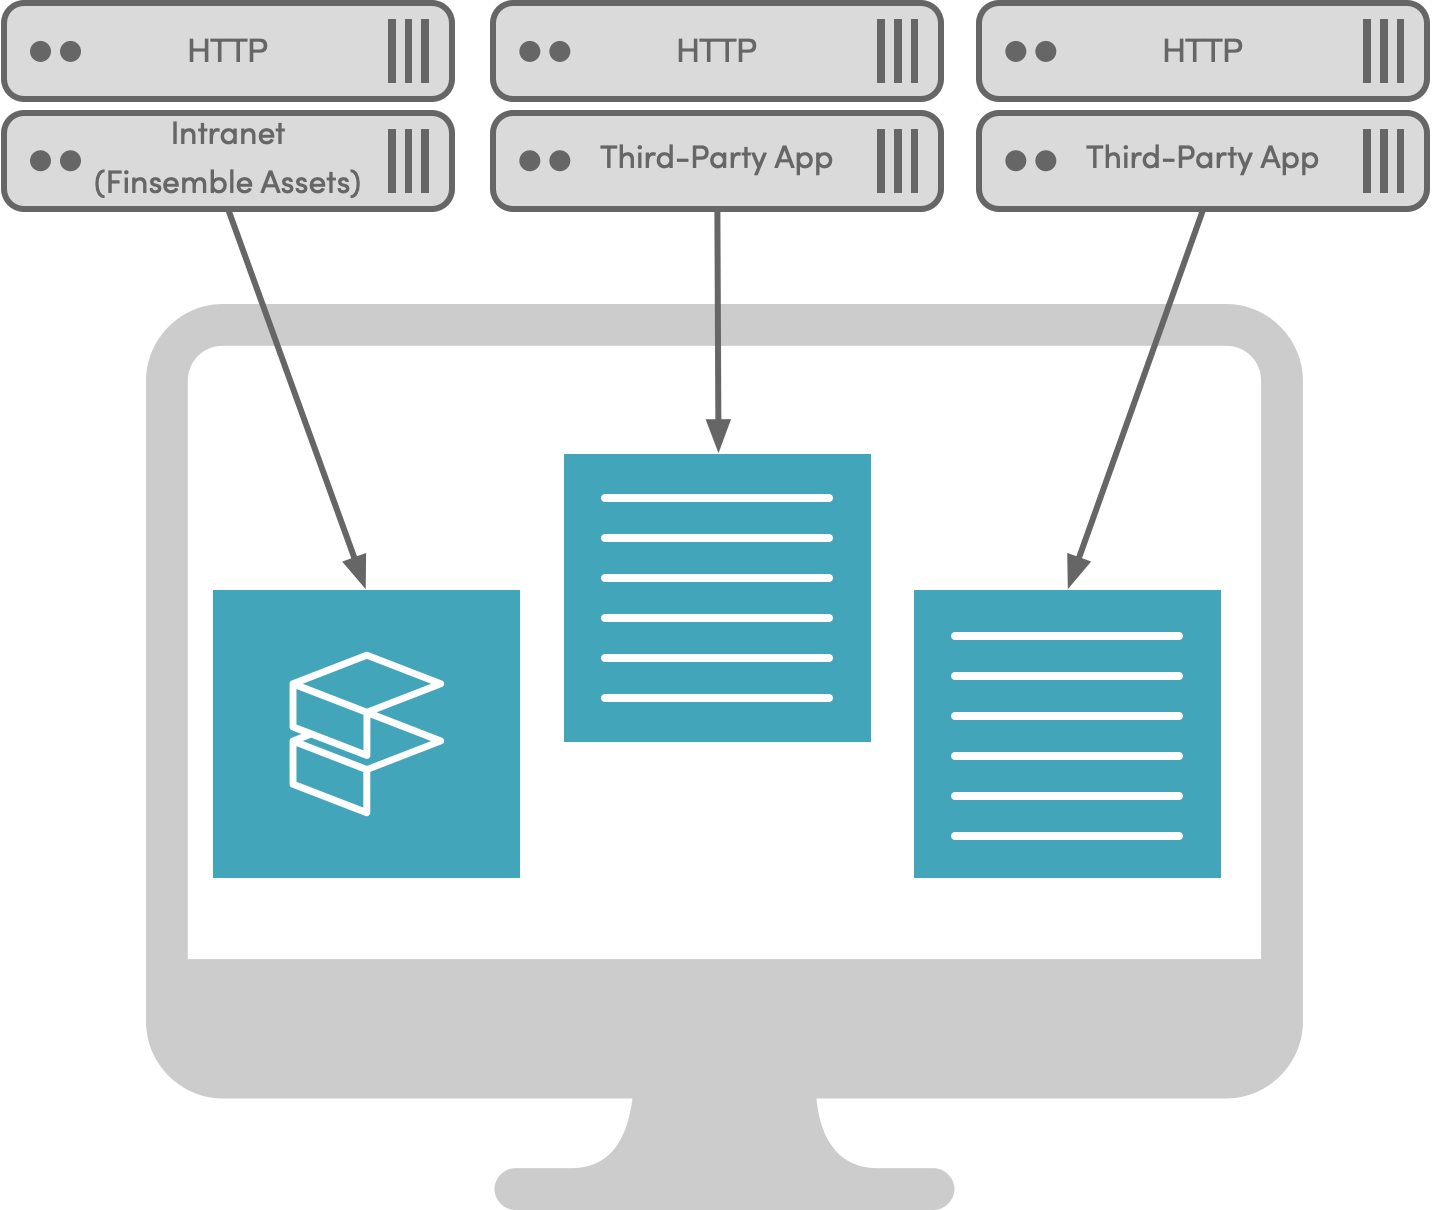
1. Hosting the public directory
To deploy your smart desktop, you must host your project's "public" folder on your web server.
Finsemble's manifest file (public/configs/application/manifest-local.json) is the entry point for your smart desktop. When your smart desktop launches, it first loads the manifest and then uses the contents of the manifest to find the locations of other assets.
See Using Manifests To Manage Multiple Deployment Environments to learn how to create multiple manifests for different deployment scenarios (such as development, production, etc).
To host the Finsemble platform:
- Run
yarn buildto build your project in production mode - Copy the
publicdirectory to your web server. - Make a note of the url for your manifest file.
2. Hosting your apps
Your apps can be hosted anywhere. Each app's location is set in the manifest.window.url entry in appd.json. Each of these entries can be either an absolute path, a path relative to the manifest location, or a path relative to a manifest macro. See Using Manifest Macros.
For templates, storage adapters and other apps installed in the seed project, your AppD entries should have urls in the form $applicationRoot/YourApp/index.html. The compiled apps are in the public/build folder.
Finsemble's built-in platform is automatically copied to public/build/finsemble when you run yarn build. The platform includes Finsemble's built in UI components, services, and config.
3. Creating your smart desktop installer
Edit installer config in project.json
The "installer" section of project.json is required to build an installer for your smart desktop. Running yarn makeInstaller will use this section of the config. makeInstaller uses electron-packager to create your smart desktop executable (based on Electron) and either electron-wininstaller or electron-installer-dmg to build an installer for Windows or MacOS respectively.
Be sure that the paths to your icons and images are the correct image format. An incorrect format can cause your smart desktop to crash during launch.
manifestUrl- the location of the manifest in production. This should point to wheremanifest-local.jsonis hosted on your website.name- the name of your smart desktopversion- the version number (this appears in the executable's properties on Windows and controls auto-updates to the runtime)chromiumFlags- (optional) chromium command line flags to be set when launching Finsemble. For more info, see Supported command line switches.
By default, remote debugging (i.e. localhost:9090) is not enabled in installers. To enable remote debugging on your end user's desktops, add this to your installer config:
"chromiumFlags" : {
  "remote-debugging-port" : "9090"
}
For Windows:
icon- the path to the smart desktop installer icon for Windows (must be an .ico file). The user will see this icon on the Start menu, and in the list of apps to manage (such as when selecting an app to uninstall)
noteDon't confuse this with another icon,
application_icon, which is set in the manifest and used in the Windows taskbar. See Icons and images.loadingGif- image to display when your smart desktop is installing on Windows (must be a .gif file)author- the author(s) or publisher of the smart desktop (this appears in the executable's properties on Windows)description- (optional) a description of the smart desktop (this appears in the executable's properties on Windows)
For MacOS:
macIcon- the path to the smart desktop icon for Mac (must be an .icns file). This icon is both your installation icon and your application icon. There is no way to have one icon for the installation and another one for the application.
noteIf you specify
application_icon, it will be ignored.background- image to display when your smart desktop is installing on Mac (this must be a .png file)osxSign- a JSON object required for codesign execution (required for you app to be notarized on MacOS)
"osxSign": {
  "identity": "Developer ID Application: Cosaic (**********)" // Name of certificate to use when signing. Platform darwin will look for Developer ID Application: * (*) by default.
  "entitlements": "./yourpath/entitlements.plist" // Path to entitlements file for signing the app. If left empty then Finsemble will use defaults.
}osxNotarize- (optional) a JSON object required for app notarization. See electron-packager documentation.
"osxNotarize": {
  "appleId": "developer@cosaic.io", // The username of your Apple developer account
  "appleIdPassword": "xxxx-xxxx-xxxx-xxxx" // The app-specific password (not your Apple ID password).
}noteYou can also specify notarization tool command line parameters as environment variables or include them in a
.dotenvfile within your project. Add an emptyosxNotarizeentry to your installer config in this case. The supported command line parameters are specified in the electron notarize documentation. Any environment variable may be prefixed with either "osxNotarize" or "osxNotarization". If using a prefix, then the first letter of the argument must be capitalized. For example, the following are acceptable environment or .dotenv names: "appleId", "osxNotarizeAppleId" and "osxNotarizationAppleId".
Use a “Developer ID” application certificate for your code-signing signature. You can read more about preparing your software for notarization here.
See Signing an installer for setting the certificate entries.
Override configuration
Finsemble currently uses electron-packager to create executable applications, electron-winstaller to create Windows installers, and electron-installer-dmg to create MacOS DMG applications. Standard options for application names, icons, application signing, etc. will be derived from the above options. Any custom options for these three packages can be specified by the following:
electronPackagerOptions- Config overrides to pass to electron-packager. See electronpackager.options.electronWinstallerOptions- Windows Only - Config overrides to pass to electron-winstaller [createWindowsInstaller()] (https://github.com/electron/windows-installer).electronInstallerDmgOptions- MacOS Only - Config overrides to pass to electron-installer-dmg createDMG()
Configure multiple installers by environment
The project.json file provides the ability to specify multiple installer configurations by adding them to the environments section under a named environment. If project.json already contains an "installer" section then these environments will be merged into that installer section.
Two installer configurations, for production and staging, each of which is merged into the base installer configuration.
"installer" : {
  "version" : "3.0.0",
  "authors" : "Bob Franklin"
},
"environments" : {
  "production": {
    "installer" : {
      "manifestUrl": "http://productionsite.com/configs/application/manifest-local.json",
      "name": "my app"
    }
  },
  "staging": {
    "installer" : {
      "manifestUrl": "http://stagingsite.com/configs/application/manifest-local.json",
      "name" : "my app staging"
    }
  },
}
To make an installer for a given environment run yarn makeInstaller --environment <environment>.
::: note
You can also use npm. When you run the makeInstaller script with arguments using npm, be sure to include --, for example:
npm run makeInstaller -- --environment production)
:::
Build your installer
Run yarn makeInstaller to build the installer. Installer generation can take several minutes. The installer will be placed in the outputDirectory that is set in the "installer" section of your project.json file. (The default location is ./pkg).
Your smart desktop is ready! You can now deliver it to your users.
When your end users run the installer, it will set 2 registry keys. Elevated privileges are not needed:
- HKEY_CURRENT_USER\SOFTWARE\Classes\fsbl\shell\open\command is created on the first run of the exe you just created.
- HKEY_CURRENT_USER\SOFTWARE\Microsoft\Windows\CurrentVersion\Uninstall{INSTALL_NAME}, where INSTALL_NAME is the value of the
namefield in your installer configuration
By default, installers are built for the same platform as they themselves were built on. For example, running makeInstaller on Windows creates a Windows installer. It is possible to build a Windows installer on Mac or Linux using Mono and Wine by setting the BUILD_WIN32 environment variable to true.
Finsemble doesn't provide a standard method for distributing executables. We recommend consulting with your IT administrator. Many firms prefer to install executables using group policy.
Each type of command prompt (CMD, PowerShell, bash) may have different ways of setting environment variables, but setting the DEBUG environment variable to * will display extra debug information. For example, if you are using bash, you can run export DEBUG=* && yarn makeInstaller.
The property buildTimeout in the "installer" section of /project.json can be set to determine how long the creating the installer will run until timimng out. Defaults to 1800000 (30 mins).
Build an installer using Linux
You can build an installer on Linux, but you need to keep these dependencies in mind:
- wine32
- wine64
- mono-runtime
- mono-devel
One way to build an image is to use Docker. To get you started, here is a sample Dockerfile that contains the dependencies. You can customize it to meet your needs.
## Update the apt repo
RUN dpkg --add-architecture i386 && apt-get update
## Install required packages
RUN apt-get -y install wine32 wine64 mono-runtime mono-devel
## Set environment vars for the image
ENV BUILD_WIN32=true
Not all combinations run together. Here are some that are known to work:
- Mono JIT compiler version 6.8.0.105 (Debian 6.8.0.105+dfsg-3.2 Tue Jun 29 21:01:01 UTC 2021)
- wine-5.0.3 (Debian 5.0.3-3)
and
- Mono JIT compiler version 5.18.0.240 (Debian 5.18.0.240+dfsg-3 Wed Apr 17 16:37:36 UTC 2019)
- wine-4.0 (Debian 4.0-2)
If you want to sign your installer, you must use a Windows Virtual Machine (VM).
Updating your deployed smart desktop
Each new release of Finsemble provides you with improvements, such as new features, bug fixes, Electron upgrades, increased security, or better performance. You want to pass these improvements to the users as quickly and as painlessly as possible. Here's how.
1. Update your apps
You can update your apps at any time by deploying updated files to your web servers. New versions of your apps become available to end users when they restart their smart desktop.
2. Update the /public directory
Replace the assets on your server with your updated assets (e.g. the public directory in your seed project).
It is necessary to update the /public directory and runtime executable only when:
- You've upgraded to a new version of the Finsemble library (in your package.json); or
- You've changed installer parameters.
3. Update the smart desktop runtime
You can update the smart desktop either by pushing a new version to your users' desktops (e.g. via group policy) or by configuring your smart desktop for auto-update.
The choice of pushing releases or auto-updating depends solely on your firm's deployment preferences.
Finsemble can automatically update its runtime anytime you create and publish a new installer. We recommend that you create a new installer every time the Finsemble Electron Adapter is updated. When configured to auto-update, your smart desktop checks your web server for new versions when it launches. New versions on the web server are automatically downloaded and installed. Simply upload a new release to your web server whenever you are ready for your end users to receive updates.
Auto-update downloads occur silently unless you set finsemble.waitForUpdate to true in your manifest. With waitForUpdate, your smart desktop will pause during launch and restart when the new version is downloaded.
Here is the process. Notice that both the startup process and the update process run at the same time.
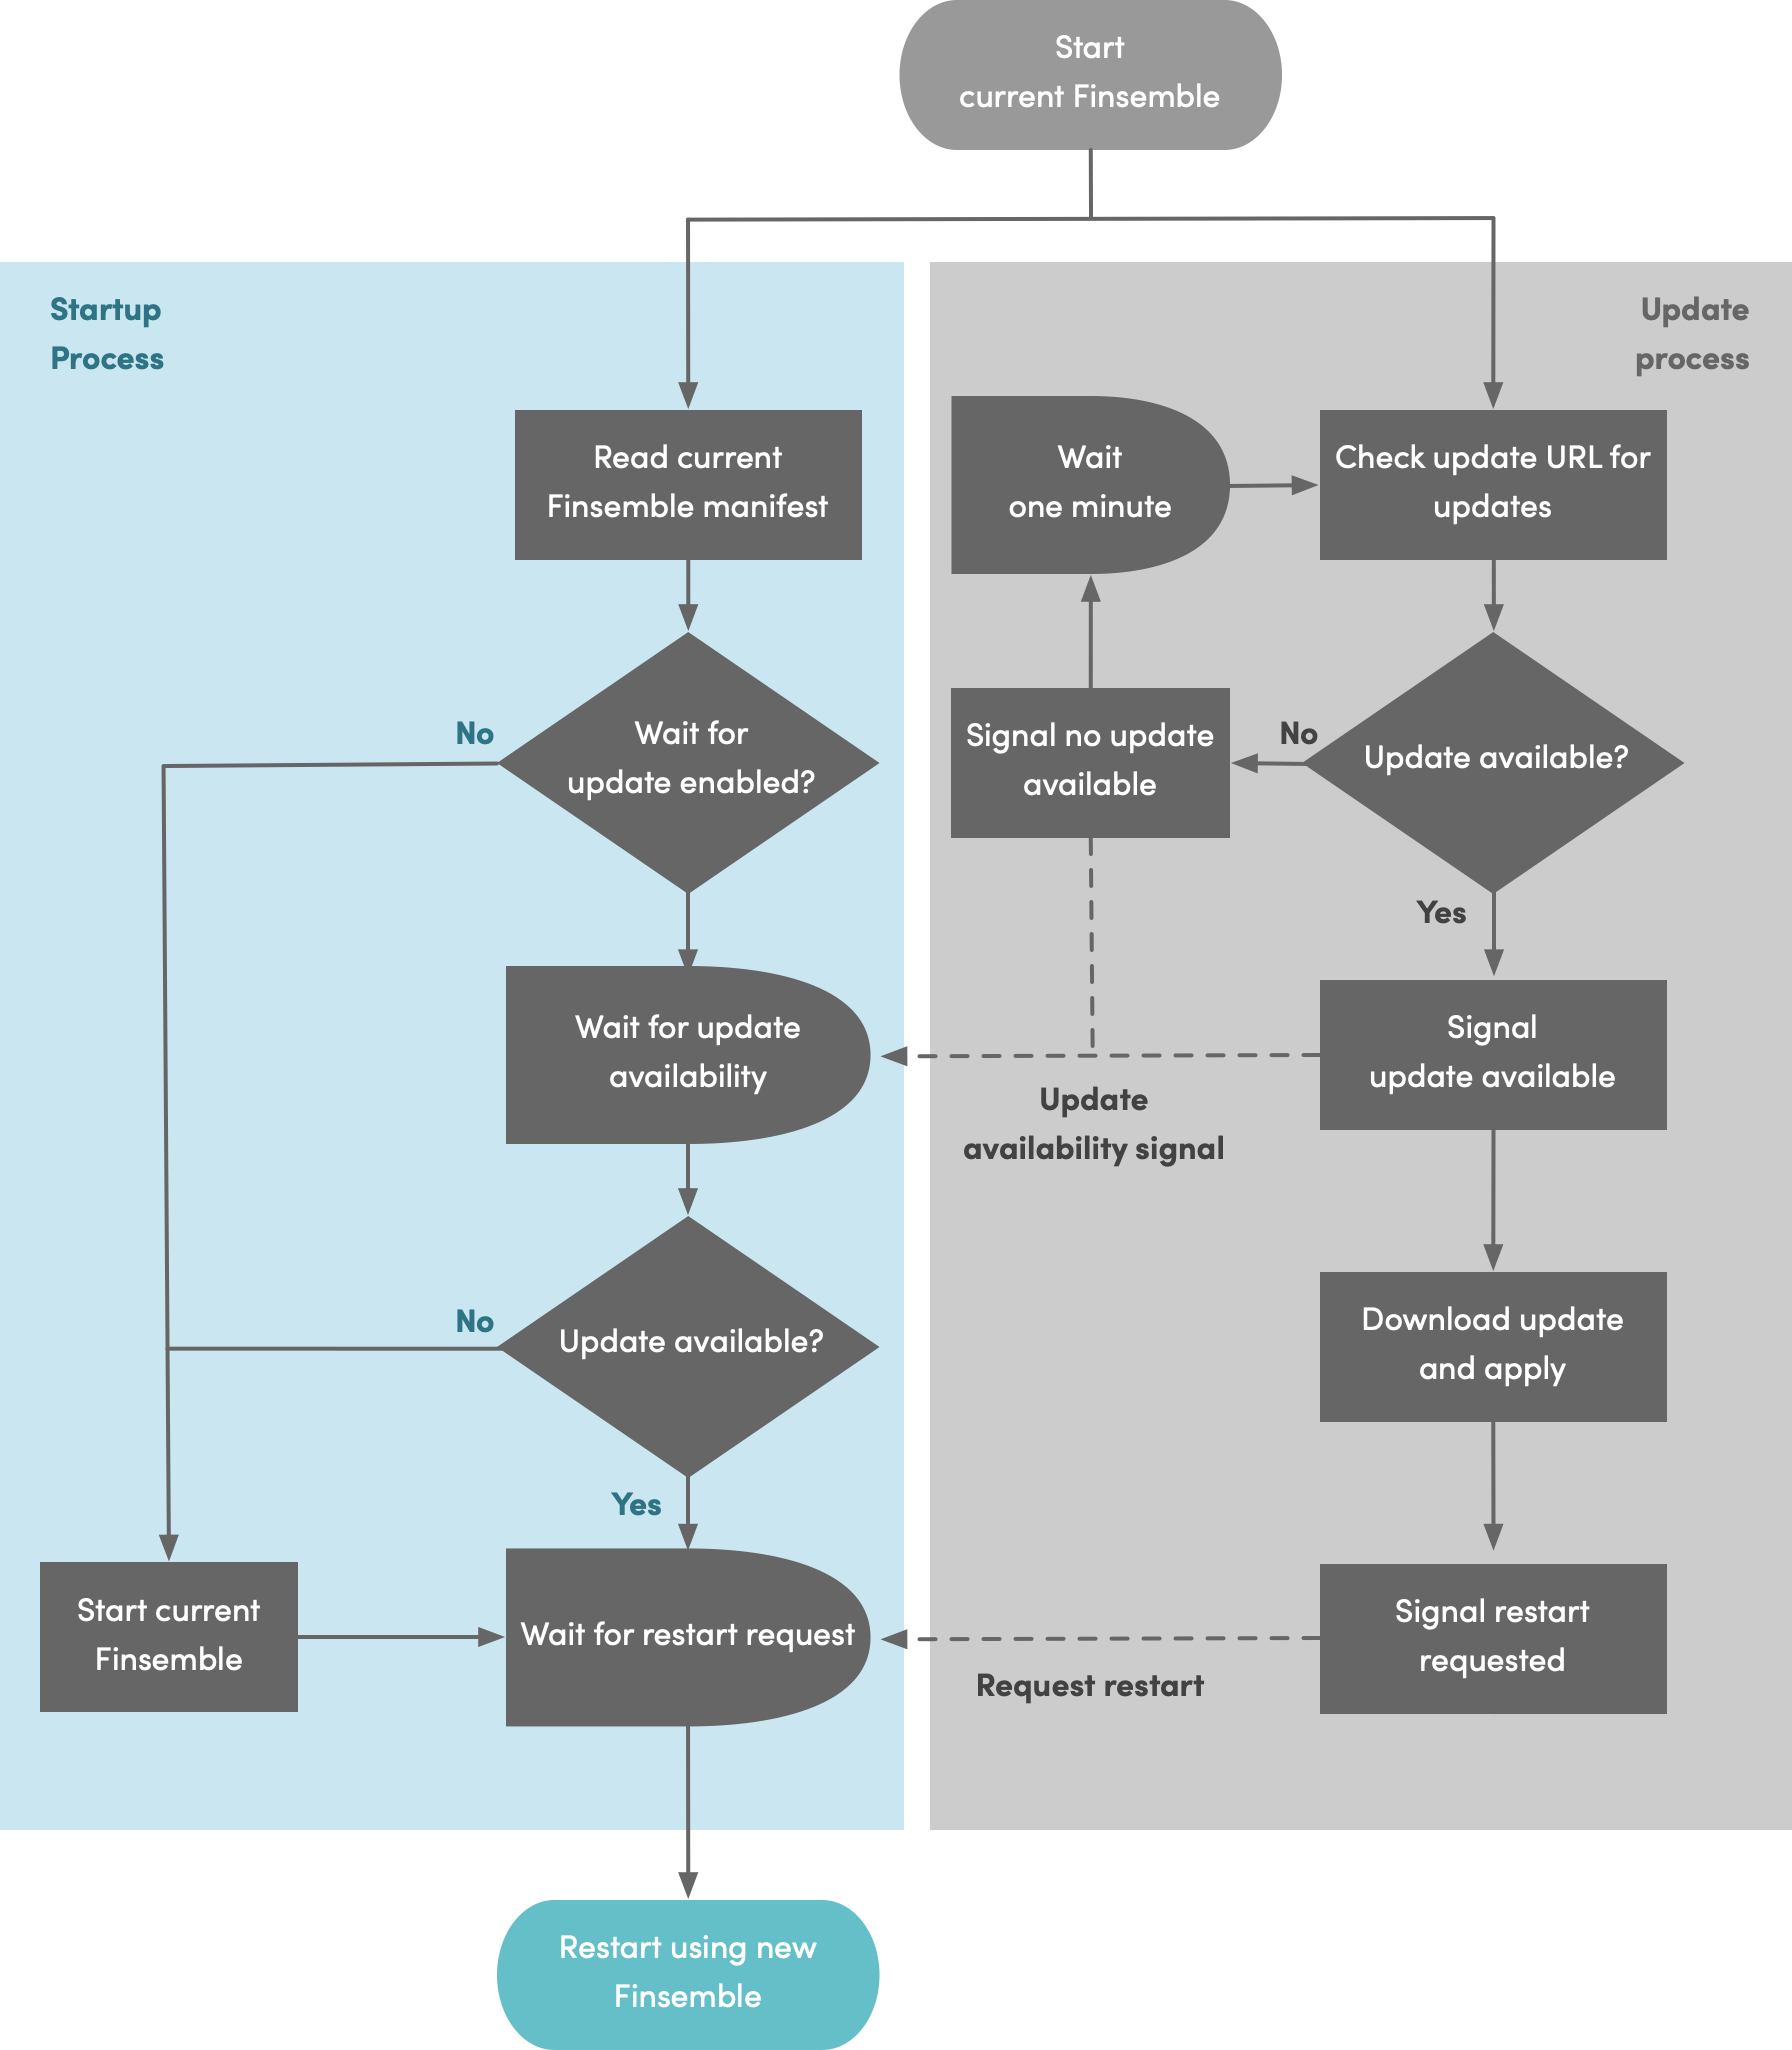
Configuring auto-update
Before building the installer, set the value for updateUrl in the "installer" section of /project.json to a URL where you will host an update server. This should be a host that your smart desktop will have access. The installer will embed this URL into your smart desktop executable. On each launch, the smart desktop will check this URL for any updates.
After building the installer you'll notice a RELEASES file and some nupkg files in the same folder as your smart desktop executable.
Save the .nupkg and RELEASES files can be used to generate differential update files to speed up future updates. You should save them on a filesystem.
Make sure you set finsemble-electron-adapter.downloadUpdatesViaElectron to true in your manifest file. This way, Finsemble will download auto update packages to the local machine using its own internal download process before passing it to the rest of the update mechanism. If you don't set this parameter, the auto update might not work. That's because typically the files needed to update Finsemble are downloaded via an external process. This external process does not send any headers when making the request and will not use any proxies that have been configured. Depending on your infrastructure, this can prevent Finsemble from downloading these files and thus prevent auto update from working.
To release new versions for auto-update:
- Set
versionin yourproject.json's "installer" section to an updated version number. - (Optional) To create a differential update, ensure that your
outputDirectoryalready exists and contains both the.nupkgandRELEASESfiles that were generated last time you created an installer. - Run
npm run makeInstaller. New versions of.nupkgandRELEASESfiles will be produced.
Save the newly generated .nupkg and RELEASES for future upgrades.
- Upload the contents of your
outputDirectoryto the location you specified inupdateUrl.
The nupkg file has several purposes. When generating an update, two nupkg files are generated: full and delta. The full nupkg file isn't used for installation, but can be used for updates. The delta nupkg file contains the delta between the binary files. This is smaller and quicker to deploy than a full installation, but is only produced if you retained the full nupkg file from previous versions.
The RELEASES file in the pkg folder contains information about all previous updates. When updating:
- the new package is downloaded and installed on the end user’s computer
- shortcuts are updated
- older versions of the container are saved in a folder with the version number.
Advanced topics
Signing an installer
You can code sign your installer so that your smart desktop can be installed in tightly controlled environments. To sign your installer, add these properties to the "installer" section of your project.json file. Then run yarn makeInstaller.
 ...
  "certificateFile": "C:/path/to/cert/file.pfx",
  "certificatePassword": "*********",
  "signWithParams": "/tr http://timestamp.digicert.com"
}
Alternatively, you can set the certificate password through the environment variable INSTALLER_CERTIFICATE_PASSPHRASE or in a .dotenv file.
Code signing on Windows uses Authenticode.
Microsoft Windows installers require a timestamp server. Installer generation will fail if the "signWithParams": "/tr http://timestamp.digicert.com" line is missing. The installer uses Windows SignTool. You can pass along any SignTool command line argument by adding it to signWithParams.
Using manifest macros to optimize complex deployments
Finsemble supports these macros, each of which tell Finsemble's runtime where to load portions of the platform. These macros are set automatically by the runtime but you can also explicitly set them if you want to change their location.
$documentRoot- points to the document root of the Finsemble platform—the assets that are deployed to your web server (typically thepublicfolder in the seed project). The default is../../(which is the relative path from manifest-local.json to public).$applicationRoot- the location of apps, adapters and preloads. The default is$documentRoot/build(typically everything that is built from your seed project's src directory).$moduleRoot- the location of the deployed core Finsemble platform files. The default is$documentRoot/finsemble. (These files are generated automatically when you runyarn devin the seed project. They are copied from thefinsemble-corenpm package.)$servicesRoot- the location of the core Finsemble platform services. The default is$moduleRoot/services.$configRoot- specifies the location of importable config files. The default is$documentRoot/configs.
You set macros in the finsemble section of the manifest. You can use either absolute paths, paths relative to the location of the manifest file, or relative to other macros. (Note that in our examples the link is ficticious.)
Example: Set documentRoot to an absolute path.
manifest-local.json
"finsemble": {
  "documentRoot": "http://production.myfirm.com/an/arbitrary/location"
}
Example: Set applicationRoot to a relative path. Relative paths are relative to the location of the manifest file.
http://myserver.com/arbitrary/location/manifest-local.json
"finsemble": {
  "applicationRoot": "../../build"
}
$applicationRoot will now be equivalent to "http://myserver.com/build".
Creating your own manifest macros
You can create your own manifest macros and use them throughout the config. Custom macros are set by adding entries to the finsemble.custom section of the manifest.
Using manifests to manage multiple deployment environments
You can create multiple manifest files to deploy multiple versions of your smart desktop. Each manifest can use manifest macros to point to different hosted assets.
Example: Multiple manifests within your hosted assets to handle development, staging, and production environments.
Directory structure of seed project
seed/
  configs/
    application/
      manifest-development.json
      manifest-production.json
      manifest-staging.json
Example: Setting the documentRoot manifest macro to point to hosted assets on a staging server.
manifest-staging.json
"finsemble" : {
  "documentRoot" : "http://staging.mycompany.com/smartdesktop"
}
In each manifest, you can set startup_app.uuid to a unique value per environment. The storage adapter for each environment may then use the uuid to generate unique storage keys, resulting in separate data sets (workspaces, favorites, etc) per environment.
Launching your smart desktop with alternate manifests
There are two ways to point your smart desktop at a different manifest:
- Build a new installer with the
manifestUrlentry pointing to the manifest URL you want - Launch your smart desktop with a command line argument pointing to the manifest URL you want:
Finsemble uses a default manifest that is hosted at the URL bundled into the runtime (the embedded manifest URL). For security reasons, the default manifest will always be loaded and allows you to set configuration that permits loading of specified alternative manifests or arbitrary manifests hosted on specified domains. This ensures that you control what manifests your installed and branded copy of Finsemble can be used to load and prevents spoofing via a desktop shortcut or protocol handler link.
After you configure your smart desktop executable in the default manifest, you can launch it with an alternative manifest either via specific command line parameters (--manifest-name or --manifest-url) or by launching your smart desktop through a protocol handler (fsbl://manifest or fsbl://manifest-url).
Here are parameters you can use:
--manifest-url=<url>where
<url>, such as http://example.com/configs/application/manifest-local.json, is the manifest url to load at run time. This url must be within the allowed manifest domains defined in the config at finsemble-electron-adapter.allowedManifestDomains. SeeallowedManifestDomainsfor more info.--manifest-name=<name>where
<name>, such asmyenv, is the named manifest to load at runtime, defined in the config at at finsemble-electron-adapter.manifests. See Finsemble electron adapter manifests for more detail.--remote-debugging-port=<port>where
<port>is a remote debugging port, such as 9090. Use this port when you need to debug startup issues. See How can I inspect configuration settings if Finsemble doesn't come up? for more info.In addition, Finsemble supports these Electron command line switches.
The configuration necessary to enable runtime manifests is set in the finsemble-electron-adapter section of the default manifest.
To allow only specific manifests to be used, create entries in finsemble-electron-adapter.manifests that map names to manifest locations:
Example:
"finsemble-electron-adapter": {
  "manifests": {
    "dev": "http://localhost:3375/configs/application/manifest-local-dev.json",
    "qa": "http://localhost:3375/configs/application/manifest-local-qa.json"
  }
}
You can now use these names to launch your smart desktop with one of the specified manifests: Project.exe --manifest-name dev or fsbl://manifest/dev (You'll need to create a new installer to test this).
As an alternative to mapped entries, you can pass arbitrary manifest urls at run time: Project.exe --manifest-url http://cosaic.io/configs/application/manifest-local-dev.json or fsbl://manifest-url/http%3A%2F%2Ffinsemble.com%3A3375%2Fconfigs%2Fapplication%2Fmanifest-local-dev.json
Finsemble validates the domains for any runtime url against the finsemble-electron-adapter.allowedManifestDomains entry:
"finsemble-electron-adapter": {
  "allowedManifestDomains": [
    "finsemble.com",
    "cosaic.io"
  ]
},
Your smart desktop exits with a dialog for the user if the requested url is invalid.
Hostnames must be an exact match. The only available wildcard is "*", which allows any run time url.
Ensure that your url is urlencoded when using a protocol handler (see above example.)
You can use both manifests and allowedManifestDomains together. URLs specified in the manifests property don’t need to be from one of the domains specified in allowedManifestDomains.
A strategy for reliable upgrades and rollbacks
For every upgrade, we recommend that you create a new Finsemble platform folder and point each smart desktop version at a new manifest within that folder. This ensures that previous versions of your smart desktop continue to run with compatible assets. Users stuck on previous versions will not experience problems. Your firm can also use this strategy for rollbacks or to perform staged upgrades.
Example: Dedicated folders and manifests for two versions of the same smart desktop.
Web server document root for http://production.yourfirm.com/
doument_root/
  updates/
    .nupkg
    RELEASES
    ...
  5.0/
    configs/
      application/
        manifest.json
        ...
    build/
    assets/
  5.1/
    configs/
      application/
        manifest.json
        ...
    build/
    assets/
This strategy works well for both upgrades and rollbacks. For more info about rollbacks, see Rolling back a release.
Dealing with unreliable network connections
Finsemble supports configurable retries and timeouts through command line flags.
YourSmartDesktop.exe --manifest-timeout=30000- specify a custom timeout (in milliseconds) for fetching the manifest. Defaults to 10 seconds.YourSmartDesktop.exe --manifest-retries=5- specify that Finsemble should retry X attempts to fetch the manifest in case of failure or timeout. Defaults to 5.
Finsemble logs all network errors. This can be useful when dealing with startup problems or misbehaving components. Those errors show up in the log as "[error]: webRequest.onErrorOccurred" with a JSON string describing the error.
By default, all debugging and errors are logged to the FEA log, which can be found in your $AppDir/<projectname>/logs/ directory (e.g. /users/william/AppData/roaming/<Your App Name or "Electron">/logs/FEA-2020-11-16.log). You can also optionally display logs in the console by setting the command line argument --enable-console. This can be useful when debugging while developing.
You can also configure command line arguments by creating a launch config in your project.json file.
"launch": {
  "args": [
    "--manifest-timeout=15000",
    "--manifest-retries=5",
    "--enable-console",
    "--log-network-errors"
  ]
}
Silent installs
To execute a silent install of your smart desktop, use the command line to run the installer with the --silent flag.
$ installer.exe --silent
See also
For a more thorough discussion of what Finsemble physically is and how it's structured, see the Architectural Overview.
If you want to incorporate native components (.EXE, Java, Flash, etc.) into a Finsemble application, you must use the Windows executable assimilationMain.exe. Read about how to bundle applications with your smart desktop.